Troubleshooting
Alation Cloud Service Applies to Alation Cloud Service instances of Alation
Customer Managed Applies to customer-managed instances of Alation
Enhanced Connector Enhanced connectors add extended capabilities and require a separate entitlement in addition to your Alation platform license.
Problem |
Guidance |
|---|---|
Test Connection failure with Error extracting token. |
Please ensure Server Connection values are correct. |
Test Connection Failure with Invalid License Key. |
Please Ensure License Settings values are valid. |
Link to Source System is not navigating correctly. The link shows as “None” |
Please enter the correct Server URI value. Example https://<Server_Name>.us.qlikcloud.com/ |
Permission Mirroring is not working |
Please deselect Disable Permission Enforcement in settings |
Heap Memory Error during MDE Extraction |
Please check the current Memory allocation of your connector from the logs. 1 GB is the Minimum Memory requirement. Please contact Alation Support if you need to increase the memory of your connector |
API Authentication
This section provides additional information on how the connector operates. Steps are also included in case the need arises for power users, administrators or developers to perform Qlik API tests for troubleshooting purposes. This can be useful when trying to resolve application permissions and/or security problems. For this kind of API testing outside of Alation, an app such as Postman can be used in conjunction with a Qlik oAuth token or API key for your Qlik instance that you will need to generate. Instructions for obtaining tokens and keys follow.
Generate oAuth Token Manually
The Qlik Sense Cloud connector supports OAuth authentication using the client_id and client_secret.
The minimum permissions needed for generating the oAuth token and performing the desired metadata extraction are as follows:
# |
Scope Name |
Description |
|---|---|---|
1 |
user_default |
Full access to your account and content. |
2 |
Spaces.shared |
Read and manage your shared spaces |
3 |
spaces.shared:read |
Read access to shared spaces. |
4 |
spaces.managed |
Read and manage your managed spaces |
5 |
spaces.managed:read |
Read access to managed spaces. |
6 |
identity.email:read |
Read access to the user’s email address. |
7 |
identity.name:read |
Read access to the user’s full name. |
8 |
Admin.apps |
Read and manage all apps in the tenant |
9 |
Admin.apps:read |
Read all apps in the tenant |
10 |
Apps |
Read and manage your apps |
11 |
apps:read |
Read your apps |
12 |
Admin.spaces |
admin.spacesRead and manage all spaces in the tenant |
13 |
admin.spaces:read |
Read all spaces in the tenant |
14 |
spaces.data |
Read and manage your data spaces |
15 |
spaces.data:read |
Read your data spaces |
Generate API Key Manually
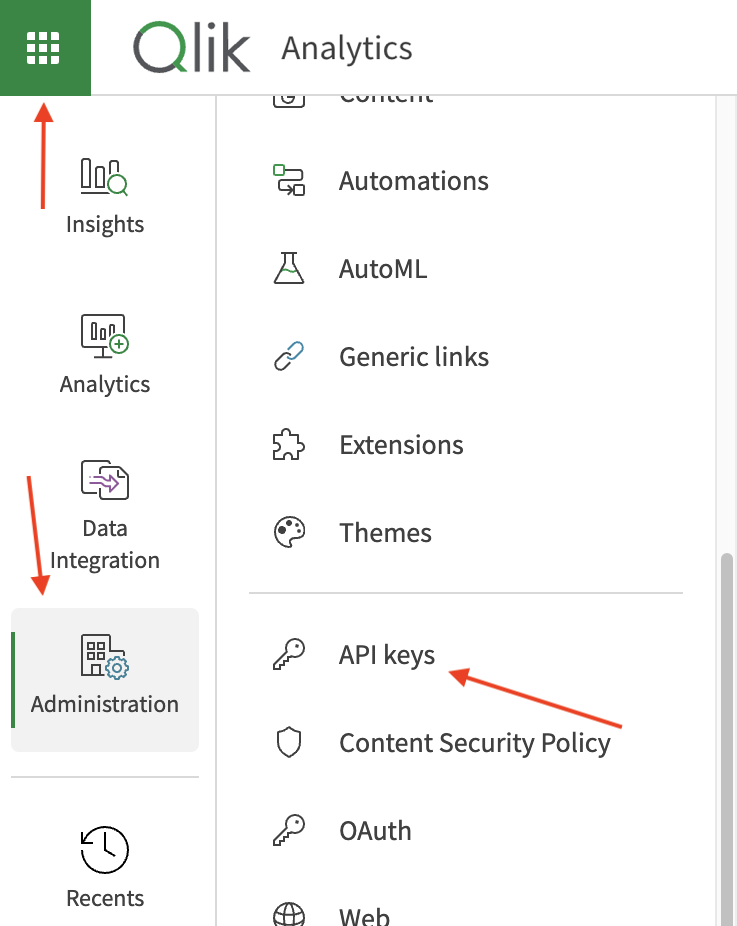
In order to access Qlik APIs from an app such as Postman, we’ll need to use an API Token. To generate the token: #. Go to the Qlik Cloud Management Console, or click the green menu button (top-left) > Administration > API Keys

Click Generate Key. Enter the required details (description, expiry) and click Generate
Make a note of the API Token.
Generate OAuth Token Programmatically
Whenever the connector needs to access REST/Websocket APIs for Qlik, it needs to pass Bearer Token/API Key each time.
Prerequisites:
To generate OAuth Token, you need to configure OAuth2 M2M Client. Refer to this link for configuration guidance: https://qlik.dev/authenticate/oauth/create-oauth-client/
Additional Details:
Refer to the following link to understand the process. Note the section “Making REST Calls” to understand how to invoke REST calls. https://qlik.dev/authenticate/oauth/getting-started-oauth-m2m/
Generate API Keys Programmatically
Whenever the connector need to access REST/Websocket APIs for Qlik, it needs to pass Bearer Token/API Key each time.
Prerequisites:
To generate API Key, make sure that current user, who is hitting the API Key endpoint, has the “Developer” role assigned to them.
Navigation flow : Users menu -> All Users -> Select the user -> Click ⋯ button -> Edit Roles

Also make sure that “Auto Assign” column for “Developer” role is set to “Anyone at …” option.
Navigation flow : Users menu -> Permissions
Refer to this link to understand the process: https://qlik.dev/authenticate/api-key/generate-your-first-api-key/
Accessing Qlik REST API
Open Postman or any REST API tool.
Create a new HTTP Request and mention the HTTP method.
In Authorization tab, specify the Bearer Token and copy the Token generated from Qlik API Console.
Specify the URL for Qlik REST API.
Accessing QiX JSON RPC API
Qlik QiX API is built on top of JSON RPC. This needs to be invoked using WebSocket protocol. HTTP works on a Request and Response model. The REST API flow is as follows
Client will send a request
New Connection is opened between Client and Server
Server will process the request
Client will get a response from Server
Connection is closed between Client and Server
The WebSocket API flow is as follows:
Client will send a NEW request
New Connection is opened between Client and Server
Server will process the request
Client will get a response from Server
Connection REMAIN OPEN between Client and Server
Client will send ADDITIONAL requests
Server will process ADDITIONAL requests
Clients will get ADDITIONAL responses from Client
This connection remains OPEN until one of the party disconnects
Accessing Qix JSON RPC API
Open Postman OR any Websocket API tool.
Create a new WebSocket (ie WSS) Request
In Authorization tab, specify the Bearer Token and copy the Token generated from Qlik Management Console.
Specify the URL for Qix Websocket API and Click Connect. The URI format should be https://<your-Qlik-instance>.us.qlikcloud.com/hub
More Information: Qlik WebSocket Help -> Qlik Sense Engine (qix) JSON-RPC | Qlik Developer Portal


