Manage Templates
Alation Cloud Service Applies to Alation Cloud Service instances of Alation
Customer Managed Applies to customer-managed instances of Alation
Important
You are viewing documentation for Alation’s Classic User Experience.
Catalog pages can be customized by customizing the templates that they are based on. Depending on the type of template, you can add, remove, rearrange, and group various fields to create custom templates that meet the needs of your organization. This topic explains how to create, edit, and delete custom templates.
You must have a Catalog Admin or Server Admin role to create, edit, or delete templates.
Note
You cannot edit the catalog page templates for query objects.
In this topic:
Find and Open Templates
To open a template:
Click on the Settings icon in the top right corner.


The Admin Settings page appears. Under the Customization section, click Custom Templates.
Catalog Admins: A dropdown menu appears. Click Customize Catalog, then click the Custom Templates tab.
Server Admins: The Admin Settings page appears. Under the Catalog Admin section, click Customize Catalog, then click the Custom Templates tab.
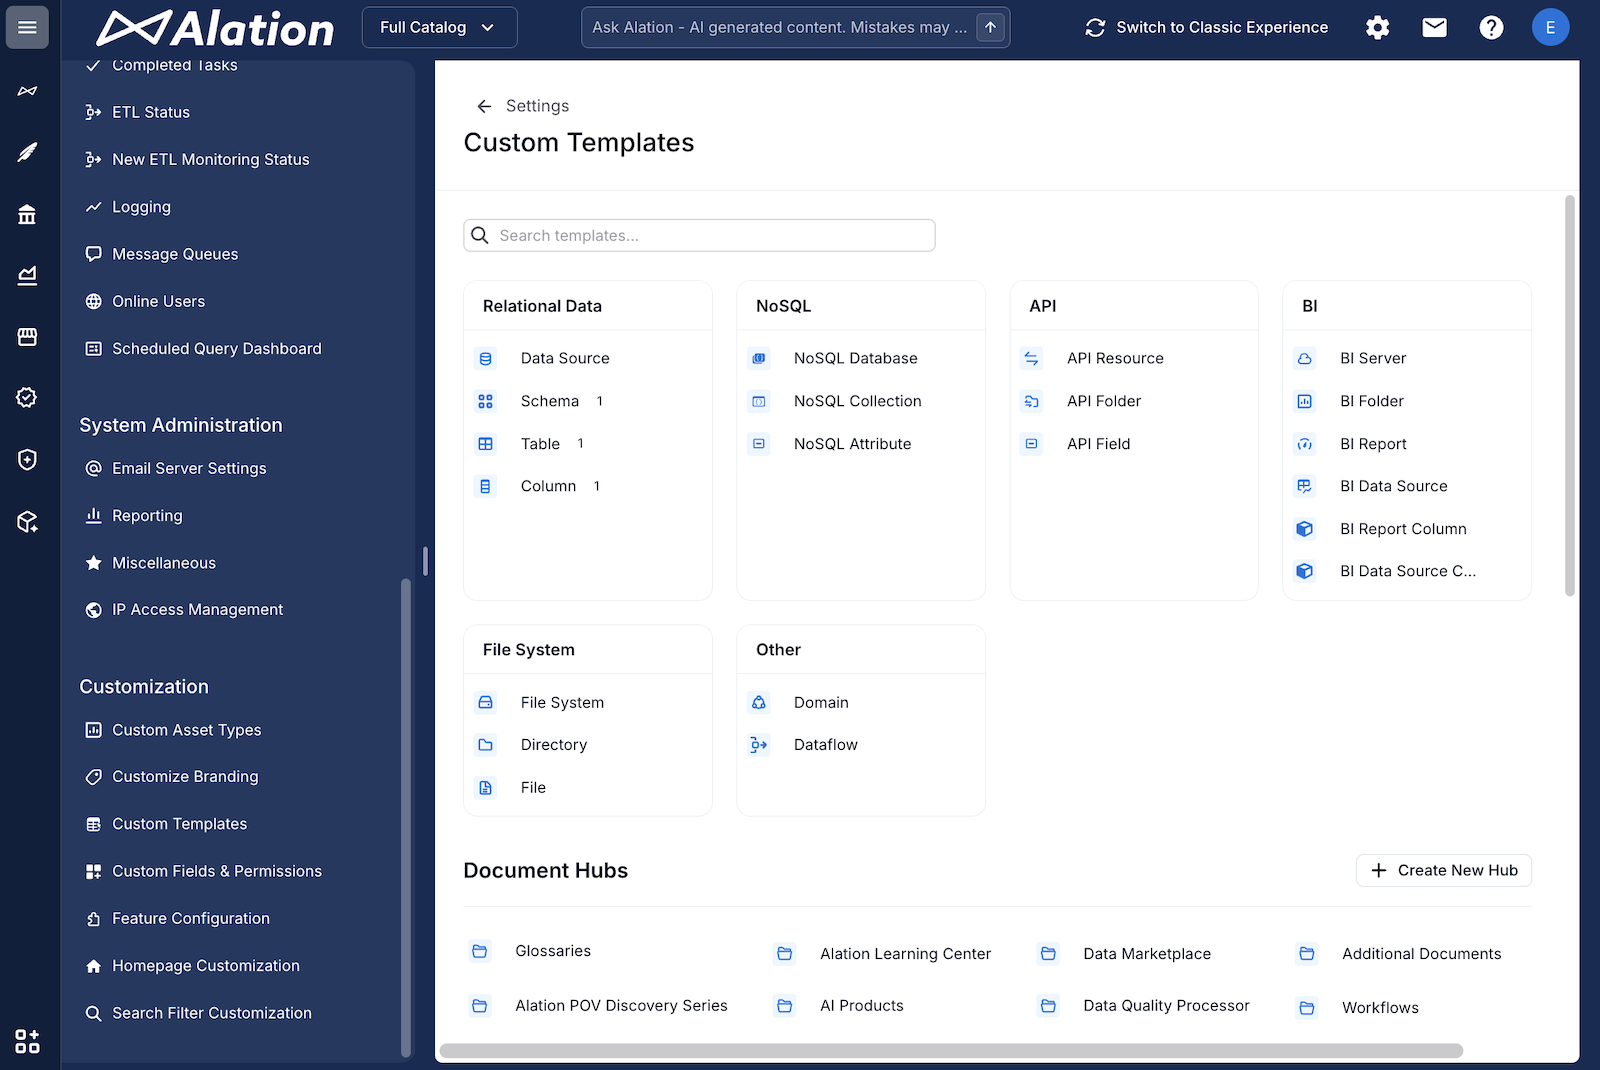
The Custom Templates page appears.
Locate the template you want to open:
Templates for data objects (data source, schema, table, column, and so on) are grouped under Data Objects in boxes such as Relational Data, NoSQL, API, BI, File System, and Other.
Templates for articles, policies, and custom asset types appear in the Article Templates, Policy Templates, and Custom Asset Types sections, when those features are enabled.
Document and folder templates are managed inside document hubs, listed under Document Hubs.
To find a template by name, enter it in the Search templates box.
Open the template:
For most object types, click the template to open the editor.
For Table, Schema, and Column, click the object type to see the list of templates for that type, then click a template to open the editor.
For documents and folders, click a document hub under Document Hubs, then open a template from the hub’s template list.
Locate a template based on its object type:
Object Type
Template Location
Articles
Under the Article Templates section.
Documents
Available starting in 2024.1, if Document Hubs are enabled. Under the Document Hubs section, click on the name of a Document Hub and look under the Document Templates heading.
Folders
Available starting in 2024.1, if Document Hubs are enabled. Under the Document Hubs section, click on the name of a Document Hub. That hub’s folder template is listed under the Folder Template heading.
Policies
Under the Policy Templates section.
Tables
Starting in 2024.1.2, you can have a different table template for each data source. Under the Data Object Templates section, click Table. Table templates will be listed on the right.
In 2024.1.1 and earlier, there is only one table template. Under the Data Object Templates section, click Table to open the table template.
Schemas
Starting in 2026.4.1, if multiple schema templates are enabled, you can have a different schema template for each data source. Under the Data Object Templates section, click Schema. Schema templates will be listed on the right. If the feature isn’t enabled, there is only one schema template. Under the Data Object Templates section, click Schema to open the schema template.
Columns
Starting in 2026.4.1, if multiple column templates are enabled, you can have a different column template for each data source. Under the Data Object Templates section, click Column. Column templates will be listed on the right. If the feature isn’t enabled, there is only one column template. Under the Data Object Templates section, click Column to open the column template.
Terms
If Document Hubs aren’t enabled, term templates can be found under the Term Types section.
All other object types
Templates for all other object types are listed under Data Object Templates.
Click on the object type or template name to open the template. The template editor opens.
Create a Template
The following object types can have multiple templates, enabling you to apply a different template to individual objects of that type:
Articles
Documents
Policies
Tables (in 2024.1.2 and later, if enabled)
Schemas (in 2026.4.1 and later, if enabled)
Columns (in 2026.4.1 and later, if enabled)
Terms
Documents
Policies
Tables
Schemas
Columns
Note
Alation automatically creates one folder template for each document hub. Each document hub can only have one folder template, which will apply to all folders in that hub. You can’t create additional folder templates.
The following sections explain how to create new templates for each of these object types.
Create an Article Template
To create an article template:
Click on the Settings icon in the top right corner.
The Admin Settings page appears. Under the Customization section, click Custom Templates.
Catalog Admins: A dropdown menu appears. Click Customize Catalog, then click the Custom Templates tab.
Server Admins: The Admin Settings page appears. Under the Catalog Admin section, click Customize Catalog, then click the Custom Templates tab.
The Custom Templates page appears.
Scroll down to the Article Templates heading, then click the plus (+) icon next to the heading. The new template editor opens on the right.
Enter a title for the template.
If desired, edit the template’s fields. See Edit a Fixed-Order Template for help.
To save the template, click the green checkmark icon
 .
.
Create a Document Template
If you have enabled Document Hubs, you can create a new document template. If you haven’t enabled Document Hubs, you should create a term template instead.
To create a document template:
Click on the Settings icon in the top right corner.
The Admin Settings page appears. Under the Customization section, click Custom Templates.
Catalog Admins: A dropdown menu appears. Click Customize Catalog, then click the Custom Templates tab.
Server Admins: The Admin Settings page appears. Under the Catalog Admin section, click Customize Catalog, then click the Custom Templates tab.
The Custom Templates page appears.
Under Document Hubs, click the name of a document hub. The document hub editor opens.
In the templates table, click New Document Template. The template editor opens.
Note
If you just created the document hub, save it before you create templates.
Click the pencil icon next to the template name, enter a name, then click the check icon to confirm.
If desired, lay out the template’s fields on the canvas. See Edit a Template in the New User Experience for help.
Click Save at the top right of the editor.
Under the Document Hubs section, click on the name of a Document Hub, then click the plus (+) icon next to the Document Templates heading. The new template editor opens on the right.
Enter a title for the template.
If desired, edit the template’s fields. See Edit an Adjustable-Order Template for help.
Click Save at the top or bottom of the template.
Create a Policy Template
To create a business or data policy template:
Click on the Settings icon in the top right corner.
The Admin Settings page appears. Under the Customization section, click Custom Templates.
Catalog Admins: A dropdown menu appears. Click Customize Catalog, then click the Custom Templates tab.
Server Admins: The Admin Settings page appears. Under the Catalog Admin section, click Customize Catalog, then click the Custom Templates tab.
The Custom Templates page appears.
In the Policy Templates section, click Create New Template. The template editor opens.
Click the pencil icon next to the template name, enter a name, then click the check icon to confirm.
If desired, lay out the template’s fields on the canvas. See Edit a Template in the New User Experience for help.
Click Save at the top right of the editor.
Scroll down to the Policy Templates heading, then click the plus (+) icon next to the heading. The new template editor opens on the right.
Enter a title for the template.
If desired, edit the template’s fields. See Edit an Adjustable-Order Template for help.
Click Save at the top or bottom of the template.
Create a Table Template
Starting in 2024.1.2, you can create multiple table templates. Each table template can be assigned to one or more data sources. This feature must be enabled by activating the Enable creation of multiple templates for RDBMS object catalog pages toggle on the Feature Configuration page in the Admin Settings. If you’re on 2024.1 and earlier, or if the feature isn’t enabled, there is only one table template.
To create a table template when multiple templates are enabled:
Click on the Settings icon in the top right corner.
The Admin Settings page appears. Under the Customization section, click Custom Templates.
Catalog Admins: A dropdown menu appears. Click Customize Catalog, then click the Custom Templates tab.
Server Admins: The Admin Settings page appears. Under the Catalog Admin section, click Customize Catalog, then click the Custom Templates tab.
The Custom Templates page appears.
Under Data Objects, in the Relational Data box, click Table. The list of table templates appears.
Click New Template. The template editor opens.
Click the pencil icon next to the template name, enter a name, then click the check icon to confirm.
On the Template Settings tab, under Data Sources, select the data sources this template applies to.
If desired, lay out the template’s fields on the canvas. See Edit a Template in the New User Experience for help.
Click Save at the top right of the editor.
Under the Data Object Templates section, click Table. The list of existing table templates appears on the right.
Click the + New Template button. The new template editor opens.
Enter a title for the template.
Under Template Settings, click + Add Data Source to select the data source that this template will apply to. Click the blue plus (+) icon to add more data sources.
If desired, edit the template’s fields. See Edit an Adjustable-Order Template for help.
Click Save at the top or bottom of the template.
Create a Schema Template
Starting in 2026.4.1, you can create multiple schema templates. Each schema template can be assigned to one or more data sources. To enable this feature, turn on the Enable creation of multiple templates for RDBMS object catalog pages toggle on the Feature Configuration page in the Admin Settings.
To create a schema template when multiple templates are enabled:
Click on the Settings icon in the top right corner.
The Admin Settings page appears. Under the Customization section, click Custom Templates.
Catalog Admins: A dropdown menu appears. Click Customize Catalog, then click the Custom Templates tab.
Server Admins: The Admin Settings page appears. Under the Catalog Admin section, click Customize Catalog, then click the Custom Templates tab.
The Custom Templates page appears.
Under Data Objects, in the Relational Data box, click Schema. The list of schema templates appears.
Click New Template. The template editor opens.
Click the pencil icon next to the template name, enter a name, then click the check icon to confirm.
On the Template Settings tab, under Data Sources, select the data sources this template applies to.
If desired, lay out the template’s fields on the canvas. See Edit a Template in the New User Experience for help.
Click Save at the top right of the editor.
Under the Data Object Templates section, click Schema. The list of existing schema templates appears on the right.
Click the + New Template button. The new template editor opens.
Enter a title for the template.
Under Template Settings, click + Add Data Source to select the data source that this template will apply to. Click the blue plus (+) icon to add more data sources.
If desired, edit the template’s fields. See Edit an Adjustable-Order Template for help.
Click Save at the top or bottom of the template.
Create a Column Template
Starting in 2026.4.1, you can create multiple column templates. Each column template can be assigned to one or more data sources. To enable this feature, turn on the Enable creation of multiple templates for RDBMS object catalog pages toggle on the Feature Configuration page in the Admin Settings.
To create a column template when multiple templates are enabled:
Click on the Settings icon in the top right corner.
The Admin Settings page appears. Under the Customization section, click Custom Templates.
Catalog Admins: A dropdown menu appears. Click Customize Catalog, then click the Custom Templates tab.
Server Admins: The Admin Settings page appears. Under the Catalog Admin section, click Customize Catalog, then click the Custom Templates tab.
The Custom Templates page appears.
Under Data Objects, in the Relational Data box, click Column. The list of column templates appears.
Click New Template. The template editor opens.
Click the pencil icon next to the template name, enter a name, then click the check icon to confirm.
On the Template Settings tab, under Data Sources, select the data sources this template applies to.
If desired, lay out the template’s fields on the canvas. See Edit a Template in the New User Experience for help.
Click Save at the top right of the editor.
Under the Data Object Templates section, click Column. The list of existing column templates appears on the right.
Click the + New Template button. The new template editor opens.
Enter a title for the template.
Under Template Settings, click + Add Data Source to select the data source that this template will apply to. Click the blue plus (+) icon to add more data sources.
If desired, edit the template’s fields. See Edit an Adjustable-Order Template for help.
Click Save at the top or bottom of the template.
Create a Term Template
If you haven’t yet enabled Document Hubs, you can create a new term template. If you have enabled Document Hubs, terms are considered documents and you should create a document template instead.
To create a term template:
Click on the Settings icon in the top right corner.
The Admin Settings page appears. Under the Customization section, click Custom Templates.
Catalog Admins: A dropdown menu appears. Click Customize Catalog, then click the Custom Templates tab.
Server Admins: The Admin Settings page appears. Under the Catalog Admin section, click Customize Catalog, then click the Custom Templates tab.
The Custom Templates page appears.
Scroll down to the Term Types heading, then click the plus (+) icon next to the heading. The new template editor opens on the right.
Enter a title for the template.
If desired, edit the template’s fields. See Edit an Adjustable-Order Template for help.
Click Save at the top or bottom of the template.
Edit a Template
In the new user experience, every template is edited in the same drag-and-drop editor. You add fields from a panel, arrange them on a canvas, and group them as needed. See Edit a Template in the New User Experience for help.
The way in which you edit a template depends on what kind of template it is—adjustable-order or fixed-order. To determine what type of template an object has, see the Template Type Table.
Edit a Template in the New User Experience
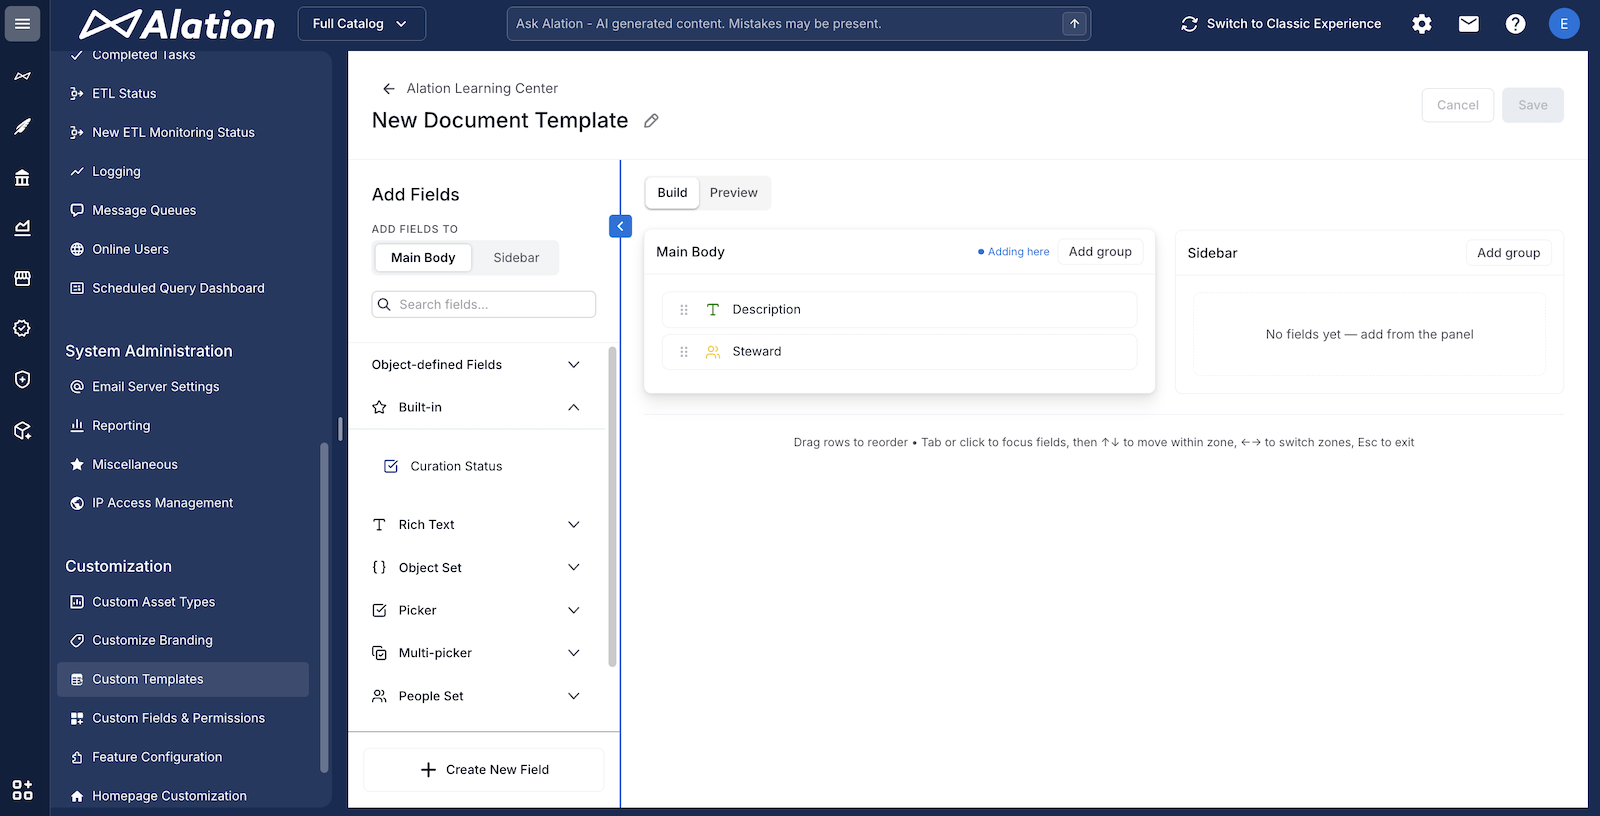
The template editor has an Add Fields panel on the left and a canvas on the right. The canvas has two zones, Main Body and Sidebar. Use the Build and Preview toggle at the top of the canvas to switch between editing the layout and previewing the catalog page. When you finish, click Save at the top right of the editor.
You can configure a template by doing any of the following:
Add a Field to a Template
To add a field to a template:
If needed, open the template. See Find and Open Templates above for help.
In the Add Fields panel, under Add fields to, select Main Body or Sidebar.
Find the field you want to add. To narrow the list, enter a name in the Search fields box.
Click the field to add it to the selected zone. You can also drag the field from the panel onto the canvas.
Note
To create a new custom field without leaving the editor, click Create New Field at the bottom of the Add Fields panel.
Click Save at the top right of the editor.
Create a Group of Fields
To add a group of fields:
If needed, open the template. See Find and Open Templates above for help.
In the zone where you want the group (Main Body or Sidebar), click Add group.
In the Create Field Group dialog, enter a Group Name, then click Create Group. The group is added to the zone.
Note
You can also create a group by dragging one field on top of another on the canvas.
Click Save at the top right of the editor.
Move a Field into a Group
To add a field to a group:
If needed, open the template. See Find and Open Templates above for help.
Click the group’s header to select it.
Click a field in the Add Fields panel, or drag a field from the panel onto the group.
Click Save at the top right of the editor.
Reorder Fields and Groups
To change the order or placement of fields and groups:
If needed, open the template. See Find and Open Templates above for help.
Drag a field or group by its handle to a new position. You can move items within a zone, between Main Body and Sidebar, and in or out of groups.
Note
Table and code fields can only be placed in the Main Body zone.
Click Save at the top right of the editor.
Rename a Group
To change a group’s title:
If needed, open the template. See Find and Open Templates above for help.
Click the group’s options menu (the three dots), then select Edit title.
In the Edit Group Title dialog, enter a new Group Title, then click Save Changes.
Click Save at the top right of the editor.
Remove a Field from a Template
To remove a field from a template:
If needed, open the template. See Find and Open Templates above for help.
On the field you want to remove, click the X (Remove field) icon. If a field doesn’t have this icon, it’s a built-in field that can’t be removed.
Click Save at the top right of the editor.
Delete a Group of Fields
To delete a group of fields:
If needed, open the template. See Find and Open Templates above for help.
Click the group’s options menu (the three dots), then select Delete group.
Click Save at the top right of the editor.
Preview a Template
To preview how a template will look on a catalog page:
If needed, open the template. See Find and Open Templates above for help.
At the top of the canvas, click Preview.
Optionally, search for an object to preview the template with that object’s real data.
To return to editing, click Build.
Edit an Adjustable-Order Template
To determine if an object type has an adjustable-order template, see the Template Type Table.
In some older versions of Alation, there are some restrictions on where certain types of custom fields can be placed in a template. These restrictions have been removed in newer versions of Alation.
In 2023.3.4 and earlier, reference fields can only be placed in the right sidebar section of the template. The built-in Related Topics and other back-reference fields had a fixed location at the bottom of the right sidebar, and they were not available to be edited on the template.
In 2024.1.3 and earlier, rich text fields can only be placed in the main section of the template.
Note
When working on your template, you can open a second browser tab with the catalog page of an object whose template you’re editing. After making and saving the changes to the template, refresh the catalog page of the object to quickly see the changes.
You can configure an adjustable-order template by doing any of the following:
Add a Field
To add a single standalone field to a template (not in a group of fields):
If needed, open the template. See Find and Open Templates above for help.
Click Insert at the location where you would like to add the field. In the menu that appears, choose what kind of field to add:
Custom Field—A custom field is a field that you have created in the Custom Fields section of the Admin Settings.
Object-defined Field—An object-defined field is a built-in field that’s associated with a particular object type.
Note
Object-defined fields are only available if:
This object type has any object-defined fields associated with it.
The object-defined fields can go in the area you’re adding the field to. Some object-defined fields can only go in the main section; others can only go in the right sidebar.
There are object-defined fields that haven’t been added to the template yet.

Find and click the field you want to add. It will be added to the template.
Note
Fields that have already been added to the template will not be available for selection. A field can only be added to a template once.
Object-defined fields that can only go in the main section will not be available for selection if you are adding a field to the right sidebar, and vice versa.
In 2023.3.4 and earlier, reference fields can only be placed in the right sidebar section of the template. In 2024.1.3 and earlier, rich text fields can only be placed in the main section of the template.
Click Save at the top or bottom of the template.

Add a Field Group
To add a group of fields:
If needed, open the template. See Find and Open Templates above for help.
Click Insert at the location where you would like to add the grouping. In the menu that appears, click Group of Fields.
In the editable area that is added, click Label Grouping to activate the field, then type a label.

Click the Save button in the group. The group will be added to the template.
Click Save at the top or bottom of the template.
You can now add fields to the group as described below.
Add a Field to a Group
If needed, open the template. See Find and Open Templates above for help.
Hover over the field group to reveal the group controls and click the + Insert or plus (+) button.


If there are only custom fields available, you will see a list of custom fields. If there are object-defined fields available, you will be asked to choose between adding a custom field or an object-defined field.
Custom Field—A custom field is a field that you have created in the Custom Fields section of the Admin Settings.
Object-defined Field—An object-defined field is a built-in field that’s associated with a particular object type.
Note
Object-defined fields are only available if:
This object type has any object-defined fields associated with it.
The object-defined fields can go in the area you’re adding the field to. Some object-defined fields can only go in the main section; others can only go in the right sidebar.
There are object-defined fields that haven’t been added to the template yet.
Find and click the field you want to add. It will be added to the template.
Click Save at the top or bottom of the template.
Rearrange Fields and Groups
You can rearrange all fields and groups up and down in the template section where they are located. Many fields can also be moved between sections. Some object-defined fields can only go in the main section; others can only go in the right sidebar. When you hover over a field in the template, you will see movement icons indicating where you can move the field.
To move a field:
If needed, open the template. See Find and Open Templates above for help.
Hover over a field in the template to reveal the field’s control icons.
Click the appropriate arrow to move the field placeholder as desired.
Click Save at the top or bottom of the template.
Order Fields within a Group
You can order the fields in a group of fields. To order:
If needed, open the template. See Find and Open Templates above for help.
Hover over the field in the group to reveal the ordering controls:

Use the up and down arrows to move the field in the grouping.
Click Save at the top or bottom of the template.
Change a Group Label
You can edit the heading label at the top of a field group. To edit:
If needed, open the template. See Find and Open Templates above for help.
Hover over the field group to reveal the group controls and click the three dots.

In the menu that opens, click Edit Grouping Label. The label will become editable.
Click on the current label to edit it, then enter the new label. The Save button in the group will become active.

Click the Save button in the group.
Click Save at the top or bottom of the template.
Remove a Field
You can remove most fields from a template, including fields that are part of a group. Some fields are built in and cannot be removed.
Removing a field from a template doesn’t remove the field from the catalog, and it doesn’t delete the field’s values. The field itself remains part of the catalog, and its values remain associated with the template’s objects behind the scenes. If you later re-add the same field to the template, the field’s values will still be there.
Note
Object-defined Fields may be removed from templates and re-added as a part of a group of fields only if this functionality is enabled. See Enable Removability of Object-defined Fields.
To remove a field from the template:
If needed, open the template. See Find and Open Templates above for help.
Hover over a field in the template to reveal the field’s control icons.
Click the field’s X icon to remove the field. The field will be removed immediately. If the field doesn’t have an X icon, it’s a built-in field and can’t be removed.
Click Save at the top or bottom of the template.
Remove a Group of Fields
Groups can be removed from a template. Removing a group will remove all fields in the group.
Removing a group from a template doesn’t remove the fields from the catalog, and it doesn’t delete any field values. The fields themselves remain part of the catalog, and their values remain associated with the template’s objects behind the scenes. If you later re-add one of the fields to the template, the field’s values will still be there.
To remove a group of fields from the template:
If needed, open the template. See Find and Open Templates above for help.
Hover over the field group to reveal the group controls and click the three dots.
In the menu that opens, click Delete Grouping. The group will be removed immediately.
Click Save at the top or bottom of the template.
Edit a Fixed-Order Template
To determine if an object type has a fixed-order template, see the Template Type Table.
You can configure a fixed-order template by adding or removing fields. Rich text fields will be displayed in the main section, and all other field types will be displayed in the right-hand section of the page and grouped by field type.
To edit a fixed-order template:
If needed, open the template. See Find and Open Templates above for help.
Select the fields to be included in the template. Deselect any fields you don’t want to include.
To save the template, click the green checkmark icon
.
Delete a Template
To delete a template:
If you’re deleting a template for documents, terms, or policies, first remove the template from all objects that use it. This includes objects that may have been deleted, since objects in Alation are generally soft-deleted and can still be associated with a template. See Find Deleted Objects That Use a Given Template below for help.
Note
Starting from version 2025.1.4, you can delete a template that is in use by objects, including deleted objects. When you delete the template, Alation will automatically reassign those objects to use the default template for their respective object types.
Open the Custom Templates page. See Find and Open Templates above for help.
Locate the template you want to delete. For table, schema, and column templates, click the object type to open its list of templates. For document and folder templates, open the document hub.
Click the template’s options menu (the three dots), then select Delete Template.
In the confirmation dialog, confirm the deletion. If prompted, type DELETE to confirm, then click Delete.
Note
If a template is in use by existing objects, the dialog warns you that deleting it will remove it from those objects.
Open the template. See Find and Open Templates above for help.
The delete button is located in a different place in adjustable-order and fixed-order templates:
Adjustable-order templates—Click the Delete button at the bottom right of the template editor.
Fixed-order templates—Click the red X icon in the top right corner of the template editor.
Note
If you get an error message saying that the template is in use, you must first remove the template from all objects that use it. This may include objects that may have been deleted, since objects in Alation are generally soft-deleted and can still be associated with a template. See Find Deleted Objects That Use a Given Template below for help.
Find Deleted Objects That Use a Given Template
To find objects that are using a template that you want to delete:
Get the name of the template you are trying to delete.
In Alation Analytics, run a query to find deleted objects that are using the template. For example, to find deleted business policies that are using a template, you could use the query below. Replace
<your_alation_instance>with the URL of your Alation instance andYour Template Titlewith the name of the template you are trying to delete.SELECT public.business_policy.title AS "Deleted Policy Title", public.business_policy.policy_id AS "Policy ID", CONCAT('https://<your_alation_instance>/policy/', public.business_policy.policy_id) AS "URL", public.custom_template.title AS "Template Title" FROM business_policy INNER JOIN public.custom_template ON public.business_policy.policy_type_id=public.custom_template.customtemplate_id WHERE public.business_policy.deleted AND public.custom_template.title LIKE 'Your Template Title';
To find deleted documents or terms you could use the query below. Replace
your_alation_instancewith the URL of your Alation instance andYour Template Titlewith the name of the template you are trying to delete.SELECT public.terms.title AS "Deleted Document", public.terms.term_id AS "Doc ID", CONCAT('https://<your_alation_instance>/document/', public.terms.term_id) AS "URL", public.custom_template.title AS "Template Title" FROM terms INNER JOIN public.custom_template ON public.terms.term_type_id=public.custom_template.customtemplate_id WHERE public.terms.deleted AND public.custom_template.title LIKE 'Your Template Title';
Visit the URLs in the query results, and remove the template from each object.