Authentication
Alation Cloud Service Applies to Alation Cloud Service instances of Alation
Customer Managed Applies to customer-managed instances of Alation
On the Authentication tab of the Admin Settings page, Server Admins can set or change the site authentication mechanism. This is typically completed during the initial configuration of your Alation system, however, changes can be applied at any time.
On Alation Cloud Service instances, you can also manage OAuth client applications, and rotate signing keys, and configure user impersonation.
In this topic:
Account Authentication Method
Alation supports the following types of authentication for logging into the Alation application:
Built-in this is the default authentication with a login and password created by a user. Users can sign up for an account on the login screen and log in after confirming their email.
LDAP requires configuration. You can configure LDAP authentication on the Authentication tab, test it, select LDAP as the active authentication method. For details about LDAP configuration, see User Authentication with LDAP.
SAML requires configuration and cannot be configured in Alation UI. Selecting and saving this value on the Authentication tab only serves informational purposes. SAML authentication should be configured and applied using the Alation backend. For details about SAML configuration, see Configure Authentication with SAML from Alation Shell.
User Signup Moderation Preference
By default, Server Admins moderate all new user access to an instance. When a new user registers from the login page, Alation automatically generates a sign-up request and places it in the User Signup Requests queue, located under the Users section of Admin Settings. Server Admins receive an email notification whenever a new user requests an account, allowing them to approve or deny the request. Upon approval, a Server Admin can assign a specific role to the new user. Learn more in Manage Signup Requests.
User signup moderation can be disabled; however, it’s not recommended due to security considerations.
Note
It is possible to enable automatic suspension and activation of users accounts based on custom group membership. When this option is turned on, the User Signup Moderation Preference will be deactivated. For details, see Use Custom Groups to Assign User Roles.
To disable user sign-up moderation:
Locate the User Signup Moderation Preference setting at the top of the Authentication tab.
Under User Signup Moderation Preference, click the toggle next to Require Server Admin’s approval before new accounts become active to deactivate it.
To re-enable sign-up moderation:
Click the toggle Require Server Admin’s approval before new accounts become active to activate it.
To view all current user sign-up requests:
Click the View User Signup Requests link on the right side of the Authentication tab. This will direct you to the Users tab where you can access this information.
User Impersonation
Allows for enabling, disabling, and configuring user impersonation. See User Impersonation.
Default User Role for New Accounts
Informs which role is currently the default. The default role is the role that all new users are assigned when they sign up for an account.
From release 2020.3, the default role can be configured. To set a default role, select a role from the role dropdown list and Save:

The default role applies to all new users and all authentication methods (built-in, LDAP, or SAML):
New users who sign up using built-in authentication will be assigned the default role;
New users who log in using LDAP authentication will be assigned the default role;
New users who sign up using SAML authentication will be assigned the default role.
The default role assignment can be changed for each individual user on the Admin Settings > Server Admin > Users tab. See Manage Users.
Inactive User Suspension Setting
Users who don’t log in into the system for extended periods of time may need to be suspended.
A Server Admin can set an auto-suspension period for inactive users. By default, inactive users are not automatically suspended. Once this period is configured, any user who has not logged into Alation within the specified period will be automatically suspended. See Suspend Users for more details on suspending users.
In addition to all user interface login activities, access to the catalog via API tokens by service accounts is also considered as login activity. However, OAuth system users and SCIM-provisioned users will not be automatically suspended due to inactivity.
To configure an auto-suspension period for inactive users:
Locate the Inactive User Suspension Setting section on the Authentication tab.
Enter a value between
30and365days in the Inactive User Suspension (in days) field. The default setting is0, indicating that auto-suspension is disabled.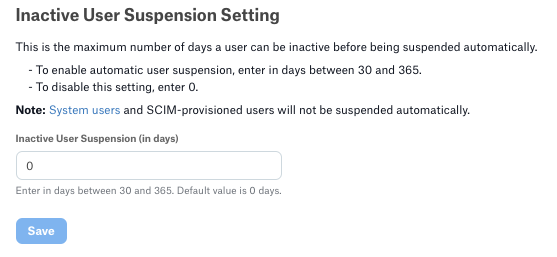
Click Save. Users who haven’t logged in for the specified period will be immediately suspended. This applies to all user accounts except for OAuth system users and SCIM-provisioned users.
To disable auto-suspension, reset the field to 0.
Note
The system executes a daily Celery task to identify and suspend users who meet the inactivity criteria. Users who are reactivated but do not log in before the next task execution will be suspended again.
Use Custom Groups to Manage User Suspension and Activation
From version 2021.1, it is possible to enable automatic suspension and activation of users accounts based on custom group membership. When this option is turned on, the default role and the User Signup Moderation Preference will be deactivated. For details, see Use Custom Groups to Assign User Roles.
OAuth Client Applications
Applies to 2023.3 and newer
Applies only to Alation Cloud Service
An OAuth Client Application acts as a secure identity for external software. It registers a third-party application (such as a custom portal, mobile app, or AI agent) with Alation, allowing it to request access to the catalog securely.
Alation supports two types of OAuth integrations to handle different security models:
Machine-to-Machine (M2M) Authorization: Designed for backend services (like automated data pipelines) that run independently. These clients use a generic “System User” identity.
User-Initiated Authorization: Designed for interactive applications where the software acts on behalf of a specific human user.
Machine to Machine (M2M)
Used for workflows, backend services, and scripts that run without user interaction. In the Admin Settings > Authentication > OAuth Client Applications Machine-to-Machine (M2M) section, you can create and edit OAuth client applications for the purpose of authenticating against Alation APIs. See Authenticate API Calls with OAuth 2.0 for more information.
Implement M2M-Initiated OAuth
Prerequisites
Ensure you have registered your app in Admin Settings > Authentication > OAuth Client Applications Machine-to-Machine (M2M).
Token Generation:
Endpoint:
POST/oauth/v2/tokenPayload:
grant_type=client_credentials, client_id, client_secret.Response: You will receive an access_token (JWT) and expiry.
Using the Token:
Include the token in the Authorization header of your API calls: Authorization: Bearer <access_token>.
For more details on API specifications, parameter lists, and response examples, see the Service User Authorization API Reference.
User-Initiated Clients
Applies to 2025.3.4 and newer
Applies only to Alation Cloud Service
User-Initiated Clients are essential for building custom tools that require user-specific permissions. Unlike M2M clients, which use a static service account with fixed permissions, a user-Initiated client allows your application to impersonate the user who is currently logged in. When a user logs into your custom app, they are redirected to Alation to approve access. Alation issues a token specifically tied to that user’s session. Any API call your app makes with this token will automatically respect that specific user’s data visibility, governance roles, and access rights. This integration supports the standard Authorization Code Grant flow (with PKCE for public clients).
Use Cases
AI Agents & MCP Servers
You are configuring an AI assistant (such as MS Azure Copilot Studio) or running a Model Context Protocol (MCP) server that allows an LLM (like Claude or ChatGPT) to answer questions about your data catalog.
Problem: You need to ensure the AI does not reveal restricted information to a user without the proper permissions. Relying on a standard service account (Machine-to-Machine) often leads to security gaps, as the account’s permissions might be over-enforced (granting too much access) or under-enforced (breaking functionality) for the specific end-user.
Solution: Register a single User-Initiated OAuth Client for the AI agent. When an employee asks the agent a question, the agent prompts them to log in via Alation. The agent then receives a token scoped strictly to that employee’s identity.
Custom Data Portals (Intranet)
Your company has an internal “Analyst Portal” where employees check their daily tasks and top-used data assets.
Solution: Instead of using a super-admin token (which would expose all notifications), the portal initiates an OAuth flow for the signed-in employee. The portal redirects the user to
GET oauth/v1/authorizeendpoint. After approval, the portal exchanges the code for a user-scoped access token. The API endpoint returns only the conversations and mentions relevant to that specific employee.
Mobile & Desktop Applications (Public Clients)
You are building a native macOS menu bar app that lets users quickly search the catalog.
Challenge: Native apps cannot securely store a “Client Secret” (it could be decompiled).
Solution: Register the app as a Public Client with PKCE (Proof Key for Code Exchange) enabled. This allows the app to perform a secure OAuth exchange without needing a secret, making it safe to distribute to end-users.
Data Science Notebooks (Jupyter/Colab)
Data scientists need to pull governed metadata into their notebooks.
Problem: Adding hard-coded static API tokens into notebooks creates a significant security compliance risk, as these tokens often leak into version control systems (like Git). Furthermore, managing the lifecycle and rotation of static tokens for every data scientist creates administrative overhead.
Solution: The notebook library initiates an OAuth flow using the user-initiated client in Alation. The user clicks a link, approves access, and the notebook session receives a short-lived access token. When the session ends, the token is discarded.
Access OAuth Settings
To view or configure OAuth clients, navigate to Admin Settings > User Management > OAuth Client Applications.
Create a User-Initiated OAuth Client
To register a new application:
In the User-Initiated Clients section, click the + Add button.
You will be directed to the creation form. Configure the following fields:
Field |
Description |
|---|---|
Name |
A unique display name for your OAuth client application. |
Client Type |
|
Redirect URIs |
Enter the allowed OAuth callback URLs (one per line).
|
Access Token Expiry |
The lifetime of the access token in seconds.
|
Refresh Token Expiry |
The lifetime of the refresh token in seconds.
|
PKCE Required |
Determines if the Proof Key for Code Exchange (PKCE) flow is enforced.
|
Click Save to generate your Client ID (and Client Secret for confidential clients).
Note
If you select Confidential, ensure you copy the Client Secret immediately. It will not be visible again after you leave the page.
Next Steps: Redirect the user’s browser to the Alation authorization endpoints, handle the callback request, and exchange code for access token. Fore more information, see Implement User-Initiated OAuth.
Implement User-Initiated OAuth
Prerequisites
Ensure you have registered your app in Admin Settings > User Management > OAuth Client Applications and selected the correct Client Type (Confidential for servers, Public for mobile/SPA).
Authorization request: Redirect the user’s browser to the Alation authorization endpoint.
You must include your client_id and the redirect_uri you registered. For public clients, you must also generate a code_challenge and include code_challenge_method=S256 (PKCE).
Endpoint:
GET /oauth/v1/authorizeRequired Params:
response_type=code,client_id,redirect_uri
Handle the callback: If the user approves the request, Alation will redirect them back to your
redirect_uriwith a temporary code.Exchange code for token: Your application makes a backend
POSTrequest to exchange the code for an access token.Endpoint:
POST /oauth/v1/tokenPayload:
grant_type=authorization_code,code,client_id,client_secret(if confidential).Response: You will receive an
access_token(JWT) and arefresh_token.
Using the token include the token in the authorization header of your API calls:
Authorization: Bearer <access_token>
Note
For full API specifications, parameter lists, and response examples, see the User Authorization API Reference.
External OAuth Integrations
Alation Cloud Service
Available from version 2026.2.1
Server Admins can configure external OAuth integrations that use access tokens issued by identity providers and validated by Alation. Refer to Configure External OAuth Integrations for details.
Signing Keys
Applies to 2023.3 and newer
Applies only to Alation Cloud Service on the cloud native architecture
In this section, you can rotate signing keys for your OAuth client applications. See Rotate the Signing Key for more information.