Manage Curation Rules
Alation Cloud Service Applies to Alation Cloud Service instances of Alation
You can create, edit, run, schedule, and delete curation rules if you have access to Curation Automation. Server Admins and Catalog Admins have access by default and can manage every rule. They can also grant access to Source Admins, Stewards, and Composers, who can then manage only the rules they create.
This topic explains how to manage curation automation rules.
Note
When you run a rule, Curation Automation changes only the objects and fields you have permission to edit. For how to grant and manage access, and how rule ownership and permissions work, see Configure Access to Curation Automation and Configure Permissions for Curation Automation.
Create a Curation Rule
Users with access to Curation Automation define the rule, scope its application, and apply it. When the rule is run, it propagates those standards, filling in missing values automatically and surfacing before-and-after previews, so every change is verifiable.
Before you create a rule, ensure that you:
Have access to Curation Automation. Server Admins and Catalog Admins have access by default. They can also grant access to Source Admins, Stewards, and Composers. For details, see Configure Access to Curation Automation.
Ensure that the target data assets and custom fields exist in the catalog (for example, the specific data objects and custom metadata fields that your rule will manage).
Define clear internal standards for acceptable values (for example, which fields are required). For more information, see Best Practices for Curation Automation.
Follow these steps to create a rule:
Step 2: Define Your Rule
Click Create Rule.
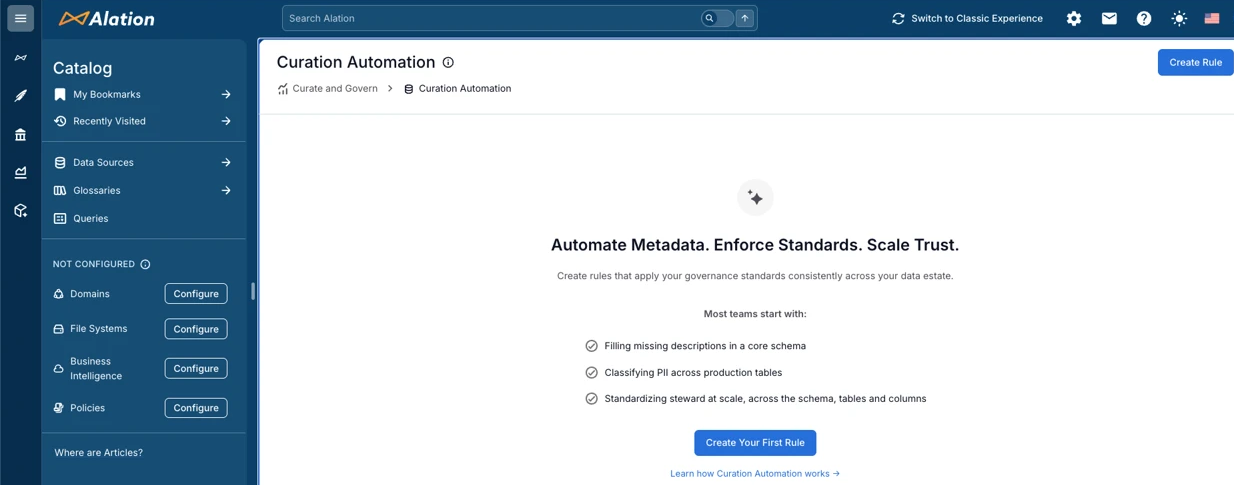
The Enter Details page opens.
Provide the rule details, such as the title and purpose of the rule, and click Next: Select Assets to move to the next step, where you define the scope for this rule. To review or refine the purpose with AI before you continue, see Suggest or Improve Instructions with AI.
Note
You can use up to 1,000 characters to frame your purpose.
Step 3: Select Assets
Click Add Scope to open a Scope section.
Click Select a Data Source to select a source (Data Source or File Systems) for your curation rule. The search dialog displays both data sources and file system sources that you can select.
Note
After adding a source, you can click on its name to open the catalog page for that source.
Choose how to define the scope for the source. Use the Search and Pattern toggle to switch between the two modes in the Asset Scope section:
Search (default): Search for and select individual assets. Use this mode to target a specific, known set of assets.
Pattern: Define naming-convention conditions for each level instead of picking assets one by one. Use this mode to target assets by name (for example, all schemas that start with
publicor all tables that end with_sales).
Note
Pattern mode is available for data source assets only (schemas, tables, and columns). File system sources support Search mode only, so the Pattern toggle does not appear for them.
Note
Switching between Search and Pattern clears the assets configured in the other mode. When you switch, Alation asks for confirmation. Click Switch and clear to continue, or Cancel to keep your current selection.
Configure the asset scope using the mode you selected, then finalize it:
After you define the scope in either mode, apply optional filters and confirm the scope.
Search Mode
In Search mode, select the specific assets the curation rule will manage. The available object types depend on which source type you selected (Data Source or File Systems).
Data sources:
Specify schemas to include.
Select All schemas (in this data source) to include the entire data asset.
Select Select specific schemas to search for and pick individual schemas from a list.
Select Do not apply to schemas if you want to curate particular tables or columns regardless of their schema.
Expand the Exclude Schemas section and select any schemas that you want to exempt from this rule.
Select table and column inclusion. Repeat the selection process for the Tables and Columns sections to narrow down the scope for your rule.
File systems:
Specify directories to include.
Select All directories (in this data source) to include all directories.
Select Select specific directories to pick individual directories from a list.
Select Do not apply to directories if you want to curate particular files or file attributes regardless of their directory.
Select file and file attribute inclusion. Repeat the selection process for the Files and File Attributes sections to narrow down the scope for your rule.
Note
Selecting All schemas, All tables, All columns, All directories, All files, or All file attributes implies that the rule is applicable to all objects of that type within the selected source and will affect all those assets. Carefully review your selection.
When you select specific schemas, tables, or columns that contain special characters (for example,
.,/,?), wrap your search term in double quotation marks to ensure accurate search results. For example, if you want to search for a schema namedsales.data, enter"sales.data"in the search bar.
After you select the assets, apply optional filters and confirm the scope.
Pattern Mode
In Pattern mode, specify the conditions for the object name only (schema name, table name, or column name). You cannot specify conditions for custom fields, tags, or domains. Specify the conditions for each level of the object hierarchy (schemas, tables, and columns) to define the scope for your rule.
Note
Pattern mode is available for data source assets only. File system sources support Search mode only.
At the Schemas level, select one of the following options:
Do not apply to schemas: Do not scope this schema by name.
Select specific schemas: Match objects whose name meets an Include condition. One Include condition line appears.
All schemas (in this Data Source): Include every object at this level. You can optionally exclude objects by name. When a parent level is already constrained by a pattern, this option names that parent instead — for example, All tables (in matching schemas) or All columns (in matching tables).
When you select Select specific schemas, define the Include condition on the line that appears:
Select an operator: Starts with, Ends with, Contains, Exactly matches, or Matches regex.
Enter the value to match. For Matches regex, enter a regular expression. An invalid expression shows the inline error Enter a valid regular expression.
For example, to include every schema whose name begins with
public, select Starts with and enterpublic.Click Add exclusion to add one Exclude condition that excludes objects from the selection by name. The Exclude line uses the same four operators. When you select All schemas, the exclusion appears under the Exclude schemas matching: label.
Note
Each level supports one Include condition and one Exclude condition. There is no wildcard syntax. To match a more complex pattern, or to combine more than one condition within a single level, use Matches regex.
Select or clear the Curate these schemas checkbox. It is selected by default. When you clear it, the schema-level is used only to narrow which child assets are in scope and the objects at that level are not curated themselves.
Specify the conditions for Tables and Columns.
Note
For Tables, use the Curate these tables option to include or exclude tables from the rule’s scope. For Columns, the Curate these columns option is not available because columns are always curated when they are in scope.
As you build the conditions, Alation shows a live count of how many objects currently match each level. An object is in scope only when every active level (Schemas, Tables, and Columns) condition matches.
For example, to curate columns in tables that follow a naming convention, you might configure the levels as follows:
Schemas: Select Select specific schemas, then set the Include condition to Starts with
public.Tables: Select Select specific tables, set the Include condition to Starts with
sales, then click Add exclusion and set it to Ends withdeleted.Columns: Select All columns (in matching tables), then click Add exclusion and set it to Exactly matches
id.
After you define the conditions, apply optional filters and confirm the scope.
Finalize the Scope
After you define the asset scope in the Search or Pattern mode, apply any optional filters and confirm your selection:
(Optional) Apply scope filters to narrow your object selection. In the Filters section:
Click Add filter.
From Select field, select a picker or multi-select picker custom field (for example, Sensitivity Level or Compliance Tag). Select field lists only the picker and multi-select picker custom fields that apply to the selected object type, so the available fields depend on the object type in your scope.
Select an operator. The available operators depend on the field type:
For a picker field: is, is not, is empty, and is not empty.
For a multi-select picker field: contains any, does not contain any, is empty, and is not empty.
Select the value or values to match.
Note
The is empty and is not empty operators do not require a value.
(Optional) Click Add filter to add a second filter, then use the AND or OR toggle to set how the two filters combine.
You can add up to two filters per scope. To remove a filter, click the remove icon.
Only the objects that match the filters are included in the rule’s scope.
Click Add Scope to apply the same rule to assets from different sources.
Click Confirm All Scopes to finalize the scope of your rule. In the Confirm Scope dialog, review the summary, which lists the selected objects, any name patterns, and any scope filters (for example, schemas matching a name pattern, tables matching a name pattern (with an exclusion pattern), All columns (with an exclusion pattern) or Sensitivity Level is High OR Compliance Tag contains any SOX, HIPAA). You will be prompted to review the assets.
Note
In Pattern mode, if you select an unconstrained All schemas (in this Data Source) option, Alation prompts you to confirm before applying it, the same way it does in Search mode. A scoped All (in matching …) option applies immediately.
Click Confirm All after verifying your selection. You will be navigated to the Field Selection screen, where you can include the fields to populate.
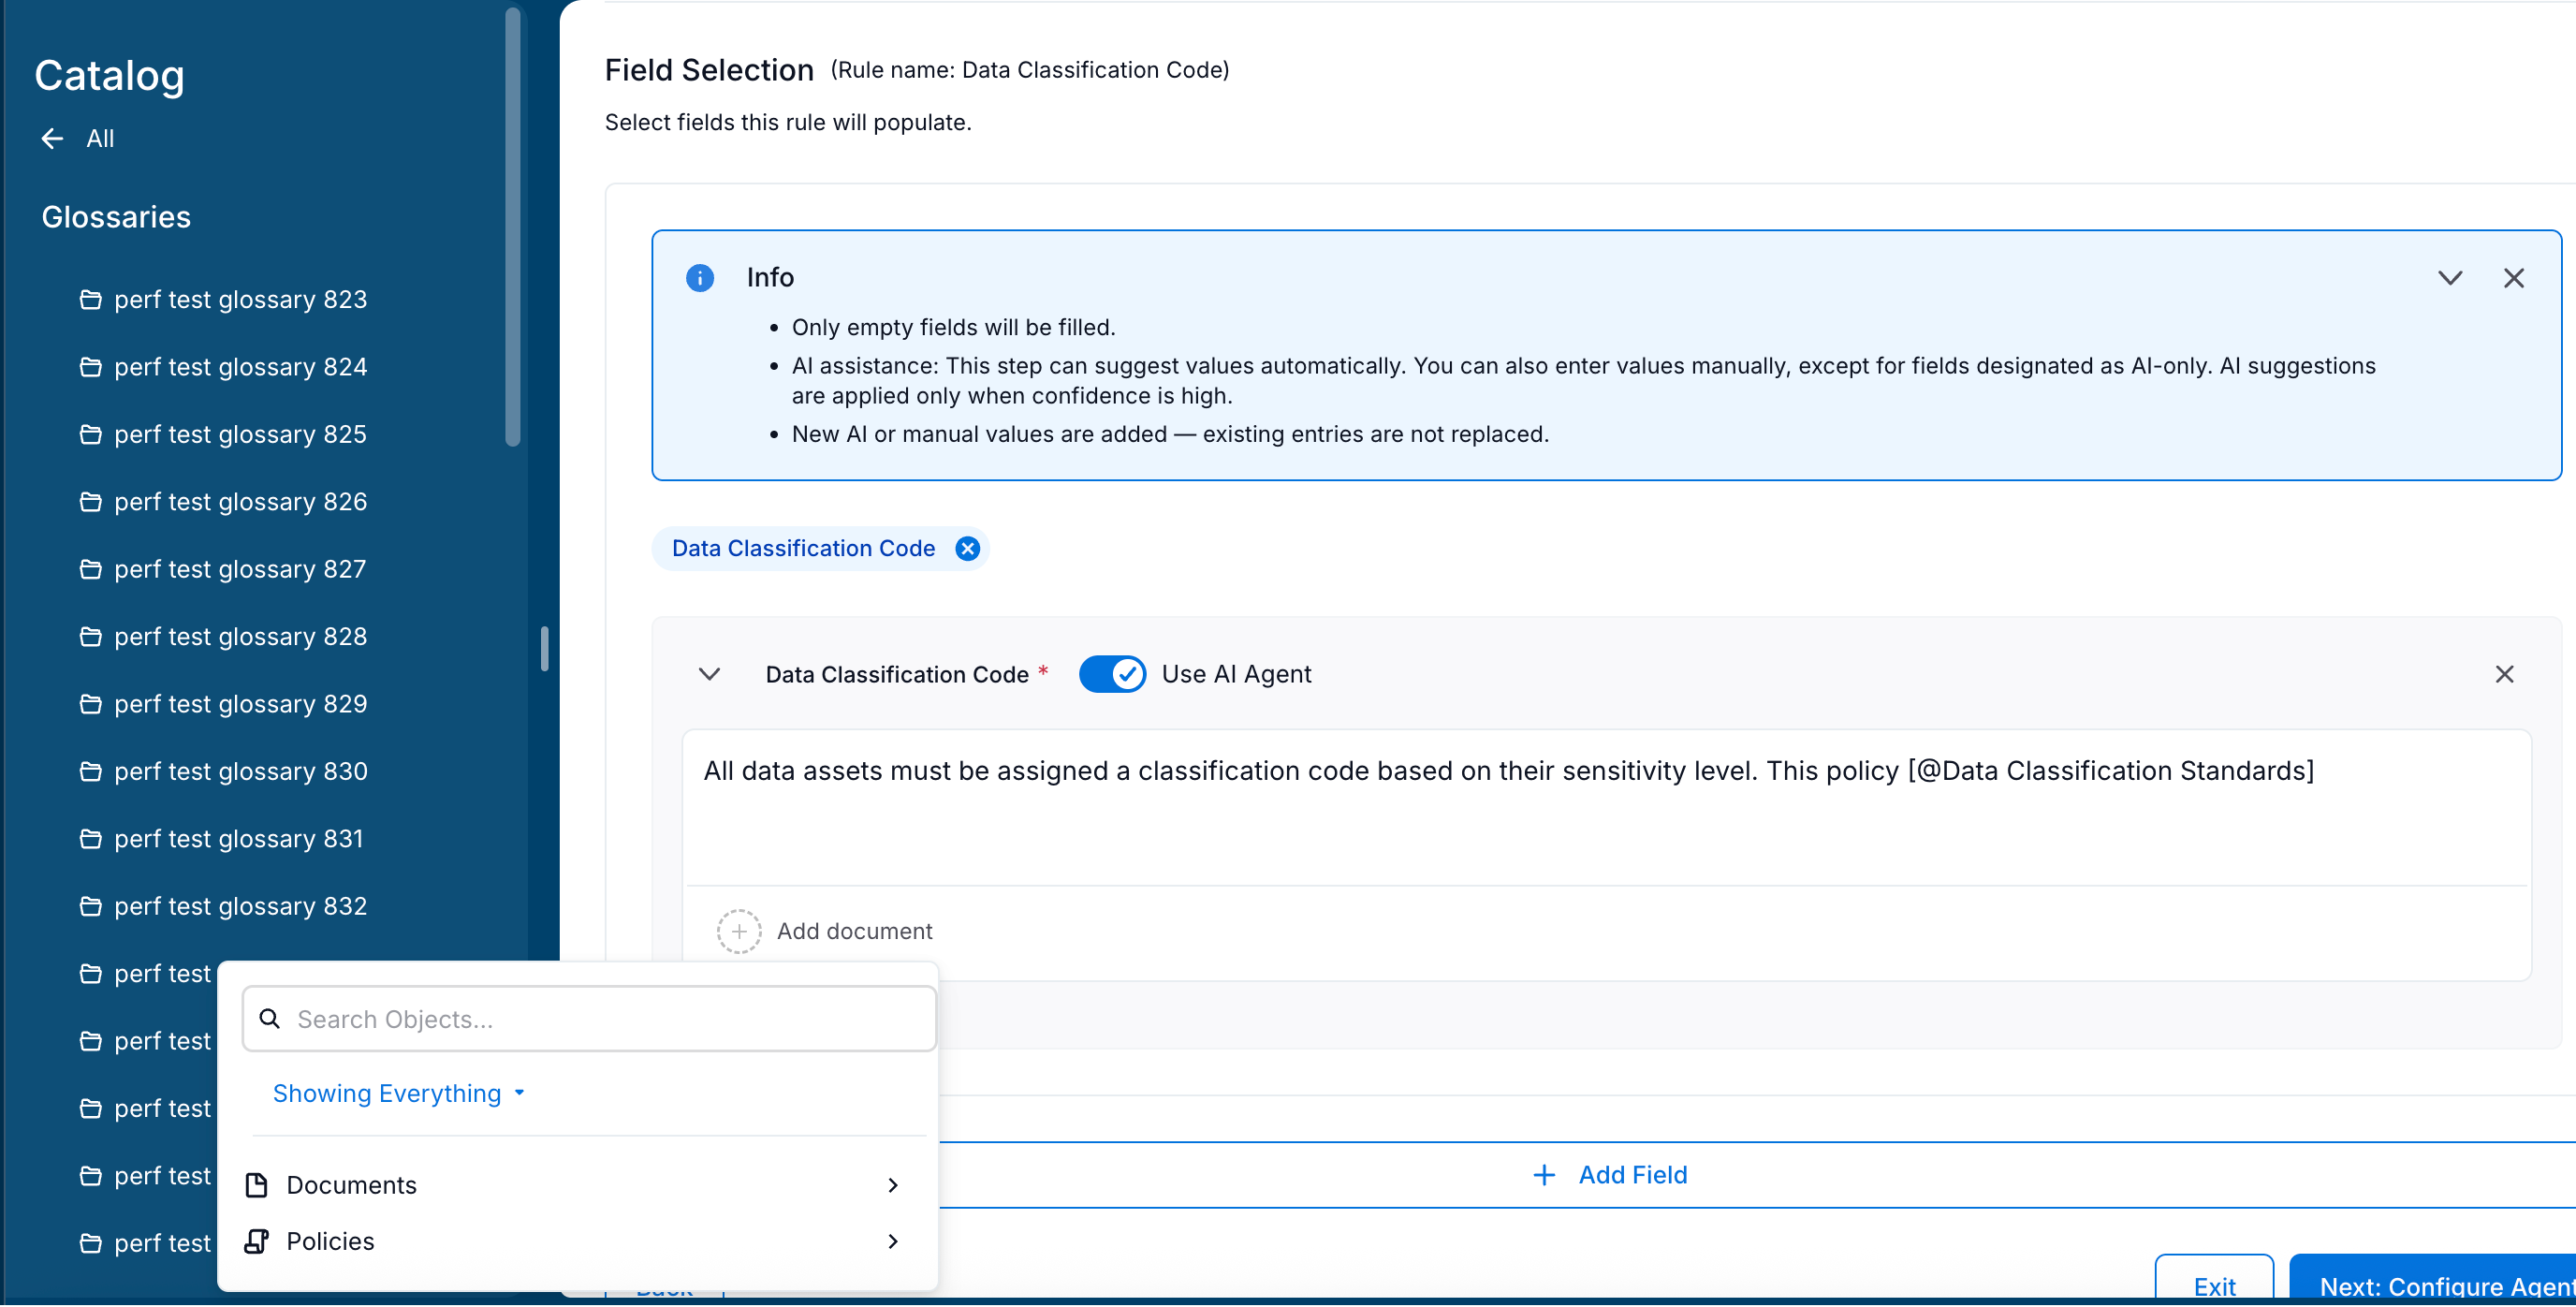
Step 4: Select Fields
Select Add field, then select a value from Choose Field.
Select the required built-in or custom fields from your catalog templates. For details on field types, refer to About Templates and Fields.
Curation Automation supports the following field types:
Built-in fields
Title
Description
Steward (manual value selection)
Custom field types
Picker
Rich Text
Multi-Select Picker
Date (manual value selection)
Note
You can add a field to the rule only if you have permission to edit it.
Some fields are editable only by a specific user group. If you are not in that group, you cannot add the field. It does not appear in the field picker. If the field is already in the rule, Alation shows a warning that you cannot edit it. That field is skipped when the rule runs.
Other fields are editable only by a people set, such as the object’s Expert or Steward. You can add this kind of field. When the rule runs, Alation checks each object. It skips the objects where you are not in the allowed people set.
For details, see Configure Permissions for Curation Automation.
Choose one of the following value generation methods:
AI-generated values: You can choose to use the AI to generate the values for the fields selected. Turn on the Use AI Agent toggle and provide an instruction for the AI to use before generating the field values. You can use up to
2,000characters to construct your instruction statement. To review or refine the instruction with AI, see Suggest or Improve Instructions with AI.Manual: For fixed values, you can manually select the values. Turn off the Use AI Agent toggle and select the required value from the provided drop-down.
AI-only fields: Some fields are by default designated as AI-only. The Use AI Agent toggle is turned on by default. Provide an instruction for AI to use before generating the field values.
Optionally, for AI-generated fields (AI-Only fields or those with the Use AI Agent toggle turned on), you can add a document to provide additional context for the AI-generated values. You can add a business policy from your Alation Policy Center or a document from your Alation Document Hub. To add a document, click Add document below the AI instruction field and select or search for the required document.
The added document appears below the AI instruction field. You can click on the document name to open and view the document. To remove the document, click on the delete icon next to the document name.
Note
You can add only one document per field. If a document exceeds 5,000 characters, Alation truncates the content to the limit (
5,000characters) and displays a warning message.
Expand the FIELD OPTIONS section to select from the following options:
Only fill if empty: The rule fills in values only for assets that have empty values for the selected field. This option is selected by default. Use this setting when fields may already contain manually curated content you want to preserve. Note that the rule skips any asset that has an existing value, even if that value is outdated.
Replace existing values: The rule replaces existing values for the selected field, regardless of whether they are empty or not. Select Factor in existing value when generating new value to provide the existing value as context to refine the existing value rather than replace it completely. You can also select Append to existing value to add the generated value to the existing value instead of replacing it. Use this setting when you are standardizing a domain with inconsistent or stale metadata. Because this setting overwrites manually curated content, validate your instruction quality on a preview sample before running the rule at full scope.
Note
The Factor in existing value when generating new value is available only for Picker, Rich Text, Multi-Select Picker, Title and Description fields. The Append to existing value option is available for Steward and Multi-Select Picker fields.
To add more fields, click on Add field and repeat the process.
Click Next: Configure Agents. You will be navigated to the Configure Agents screen where you can review the fields.
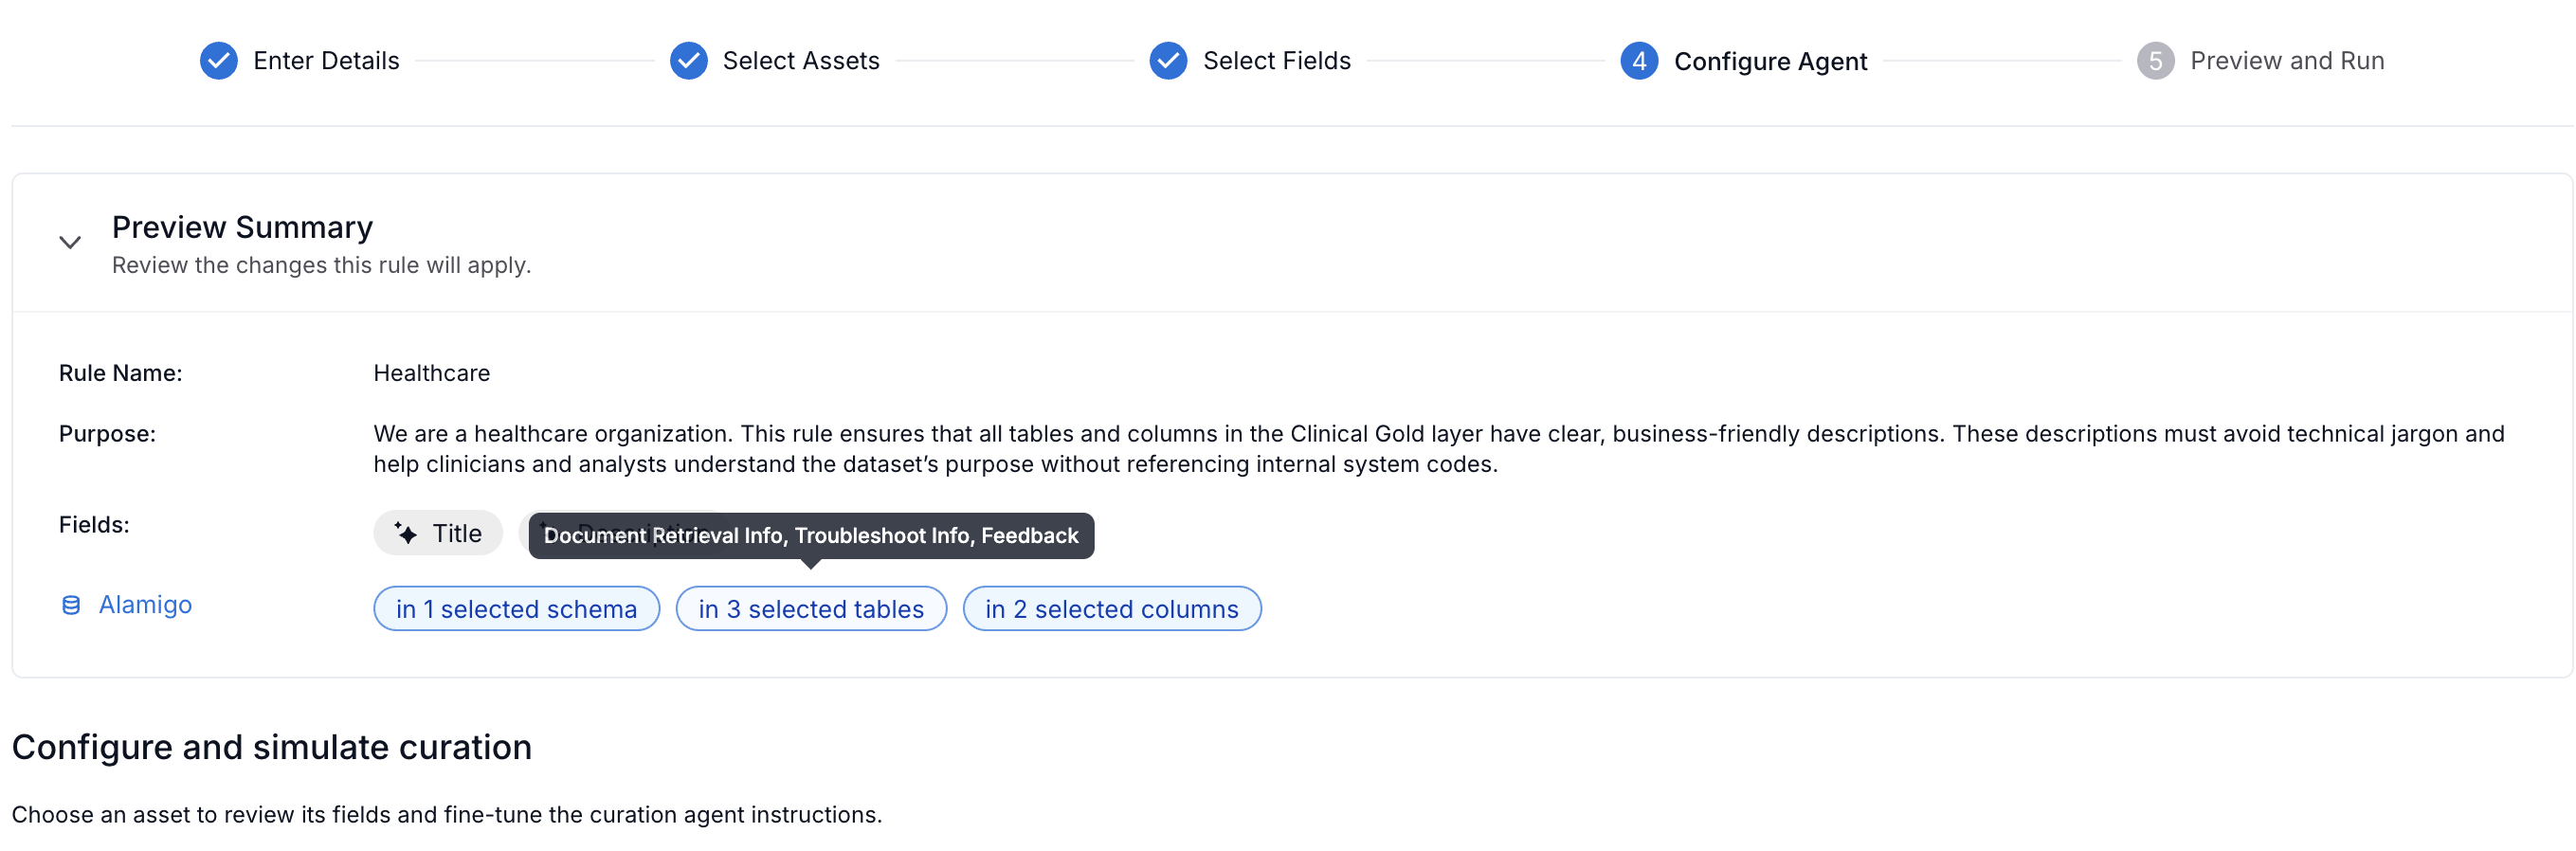
Step 5: Configure Agents
On the Configure Agents screen, search and select an object from the data source you added in the Step 3: Select Assets step to preview the before and after changes.
Note
The Preview Summary section on top provides you a summary of the all the previous steps you have completed. Expand the Preview Summary section to view the summary. Additionally, you can hover over the selected objects next to the selected data source to view the object names.
From the Select an object to preview dropdown, select an object (schema, table, or column) to preview how the rule will update fields in your scope. The dropdown lists five objects in the order of specific schemas, tables, and columns. If the number of specific objects selected (Select specific schemas, Select specific tables, or Select specific column option in the Step 3: Select Assets step) is less than
5, remaining slots display the objects from All schemas, All tables, or All columns selection in the same order. Search for a specific object by name if they are not visible in the dropdown.A table appears that displays the field name, Agent (AI or manual), the agent instructions that you provided in the Step 4: Select Fields step, the current and generated field values, and the AI confidence score.
Note
Confidence thresholds aren’t user-configurable.
Rows remain grayed out if the AI Agent made no changes.
Confidence scores reflect how certain the AI agent is about its output given the available catalog context. The following table describes each tier and what to do:
Score
Tier
What it means
75–100
High
Value is applied automatically. The agent had sufficient context.
50–74
Medium
Value is not applied. The agent made a reasonable inference but lacked strong confirming signals. Consider improving source comments, enabling Query Log Ingestion, or adding a reference document to the field instruction.
20–49
Low
Value is not applied. The agent had little to work with beyond the object name. Add Query Log Ingestion, enrich source comments, or rewrite the field instruction.
0–19
Very Low
Value is not applied. The object likely has no useful metadata available. Curate it manually, or check whether source metadata extraction is enabled on the connector.
When objects consistently return Medium or Low confidence, use Preview mode to read the AI’s reasoning alongside the generated value. Use that reasoning to understand what context the agent had and what it was guessing at, then iterate: preview, read reasoning, adjust instruction or attach a reference document, re-preview, and repeat until results reach High confidence.
If you are not satisfied with the AI confidence score or the generated value, you can edit the AI instruction.
To edit the AI instruction:
Click on the edit icon on the right side of the table. A new modal opens for you to update your AI instructions. You can also select a custom agent from the Agent dropdown. For more information on custom agents, see Use Custom Agents for AI-Generated Fields.
Make the required changes and click Re-generate to generate the field values based on the updated instruction.
Click Save. You are navigated back to the Configure Agents screen. The table now displays the results based on the updated instruction.
Click Next: Preview Changes to review the curation summary.
Step 6: Preview and Run the Rule
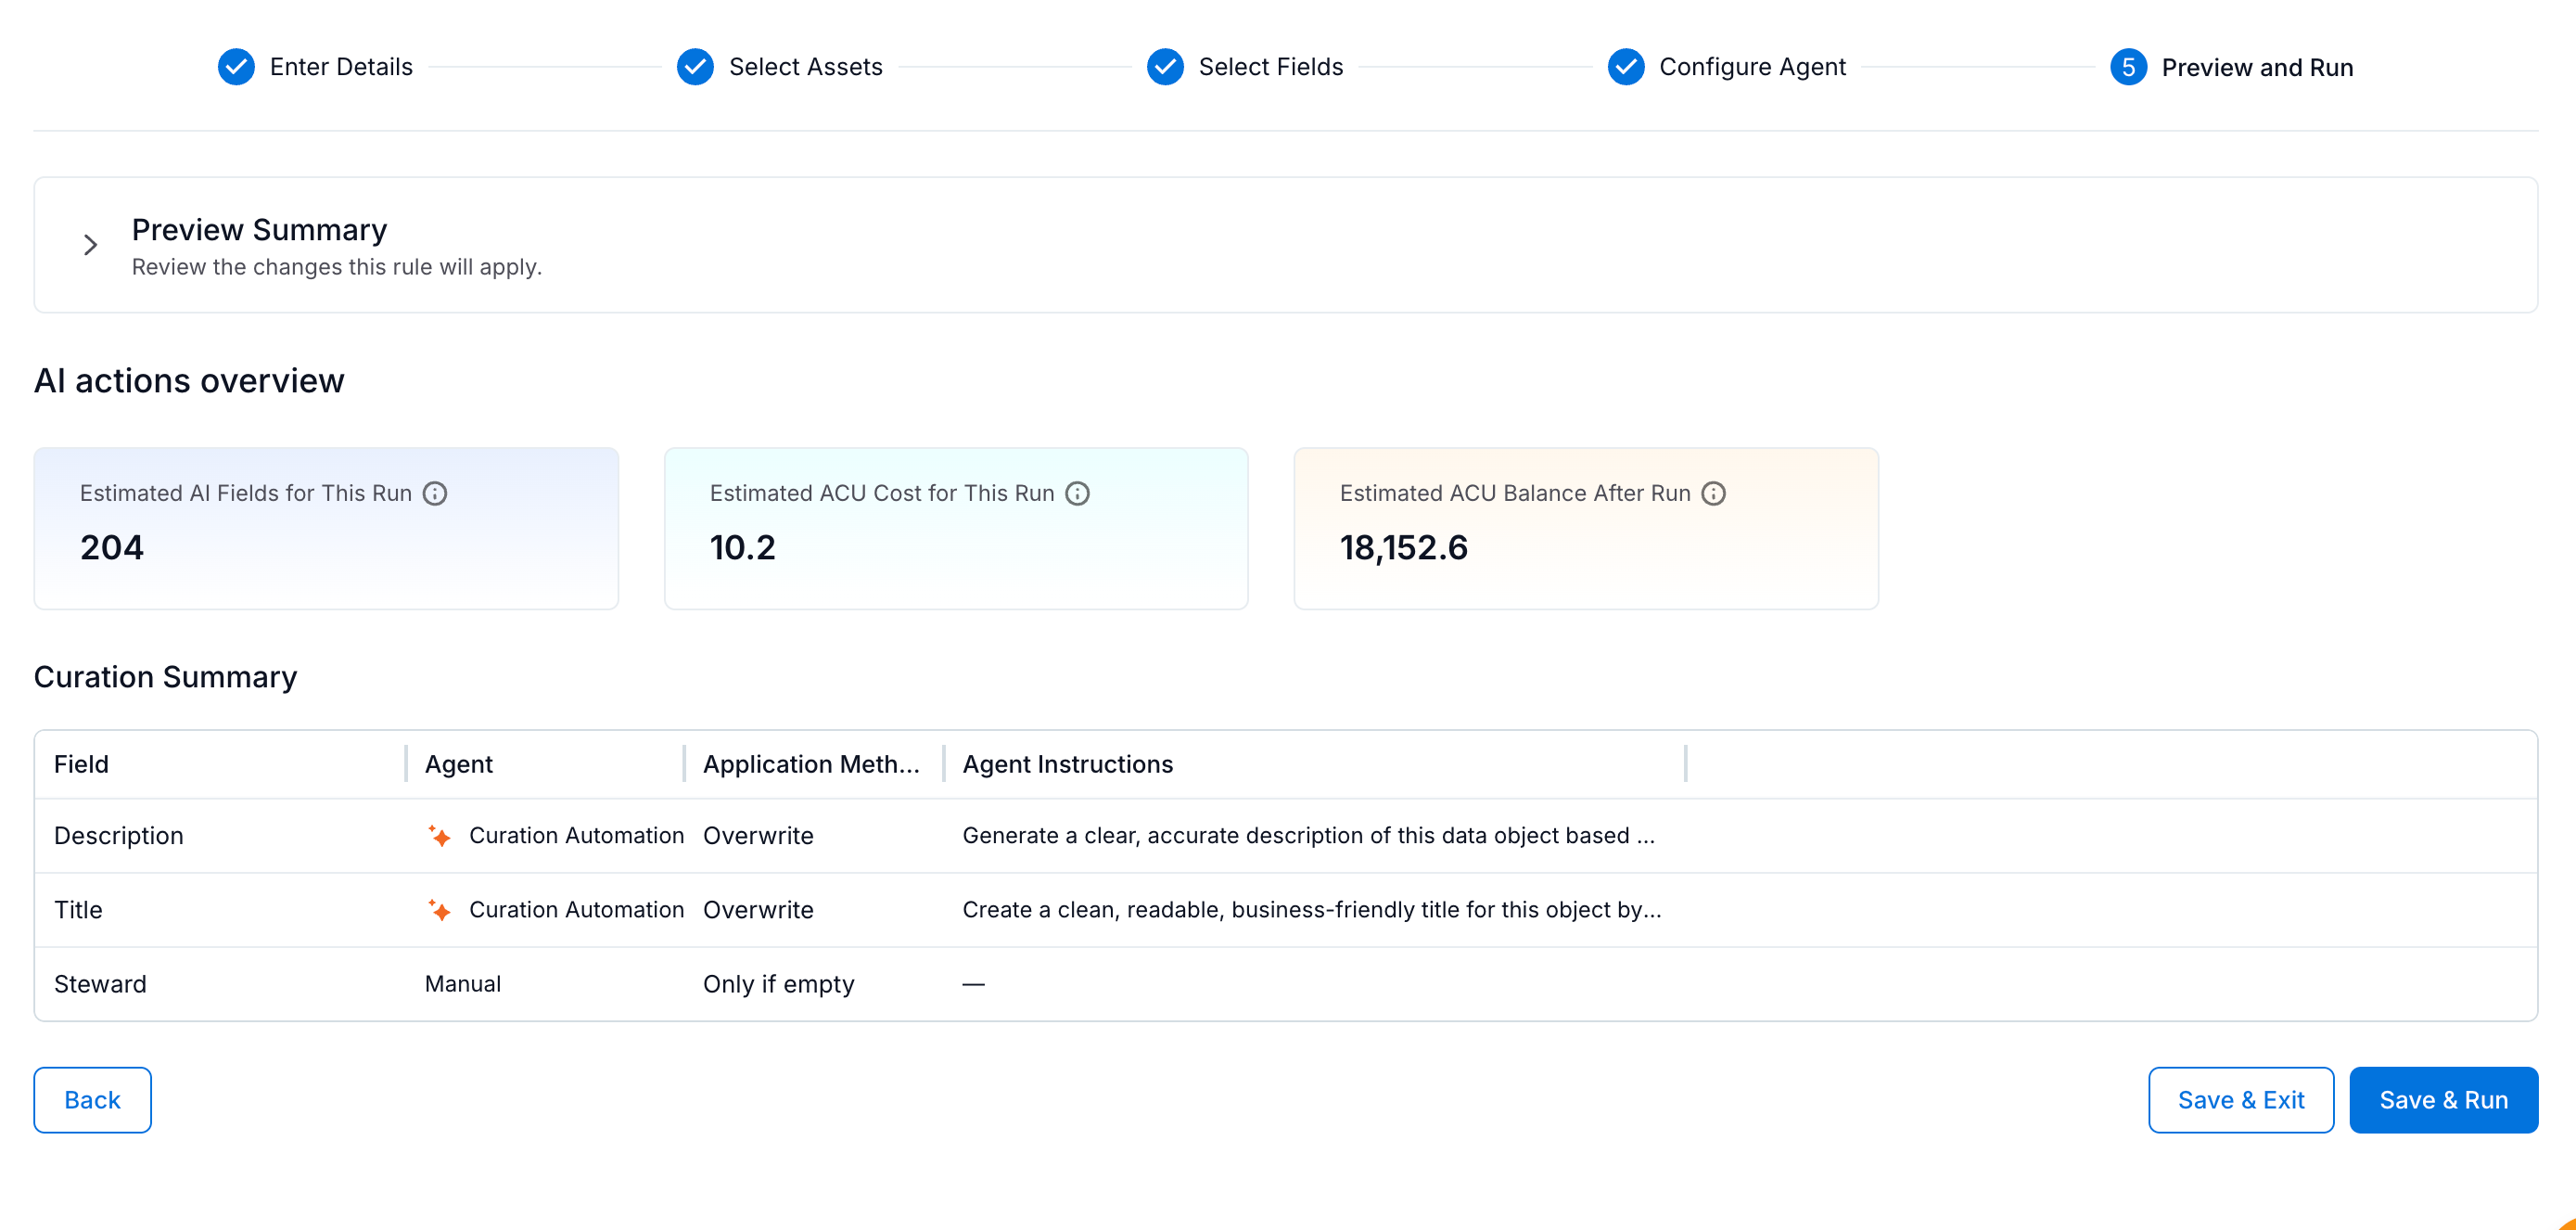
In the Preview Summary screen, preview the details of the rule in the Rule Preview table. You can also make a note of the estimated usage cards and the overall curation summary. The cards displayed depend on your AI Actions and Consumption Units entitlement type:
AI actions tenants see Estimated Actions for This Run and Estimated Actions Remaining After Run.
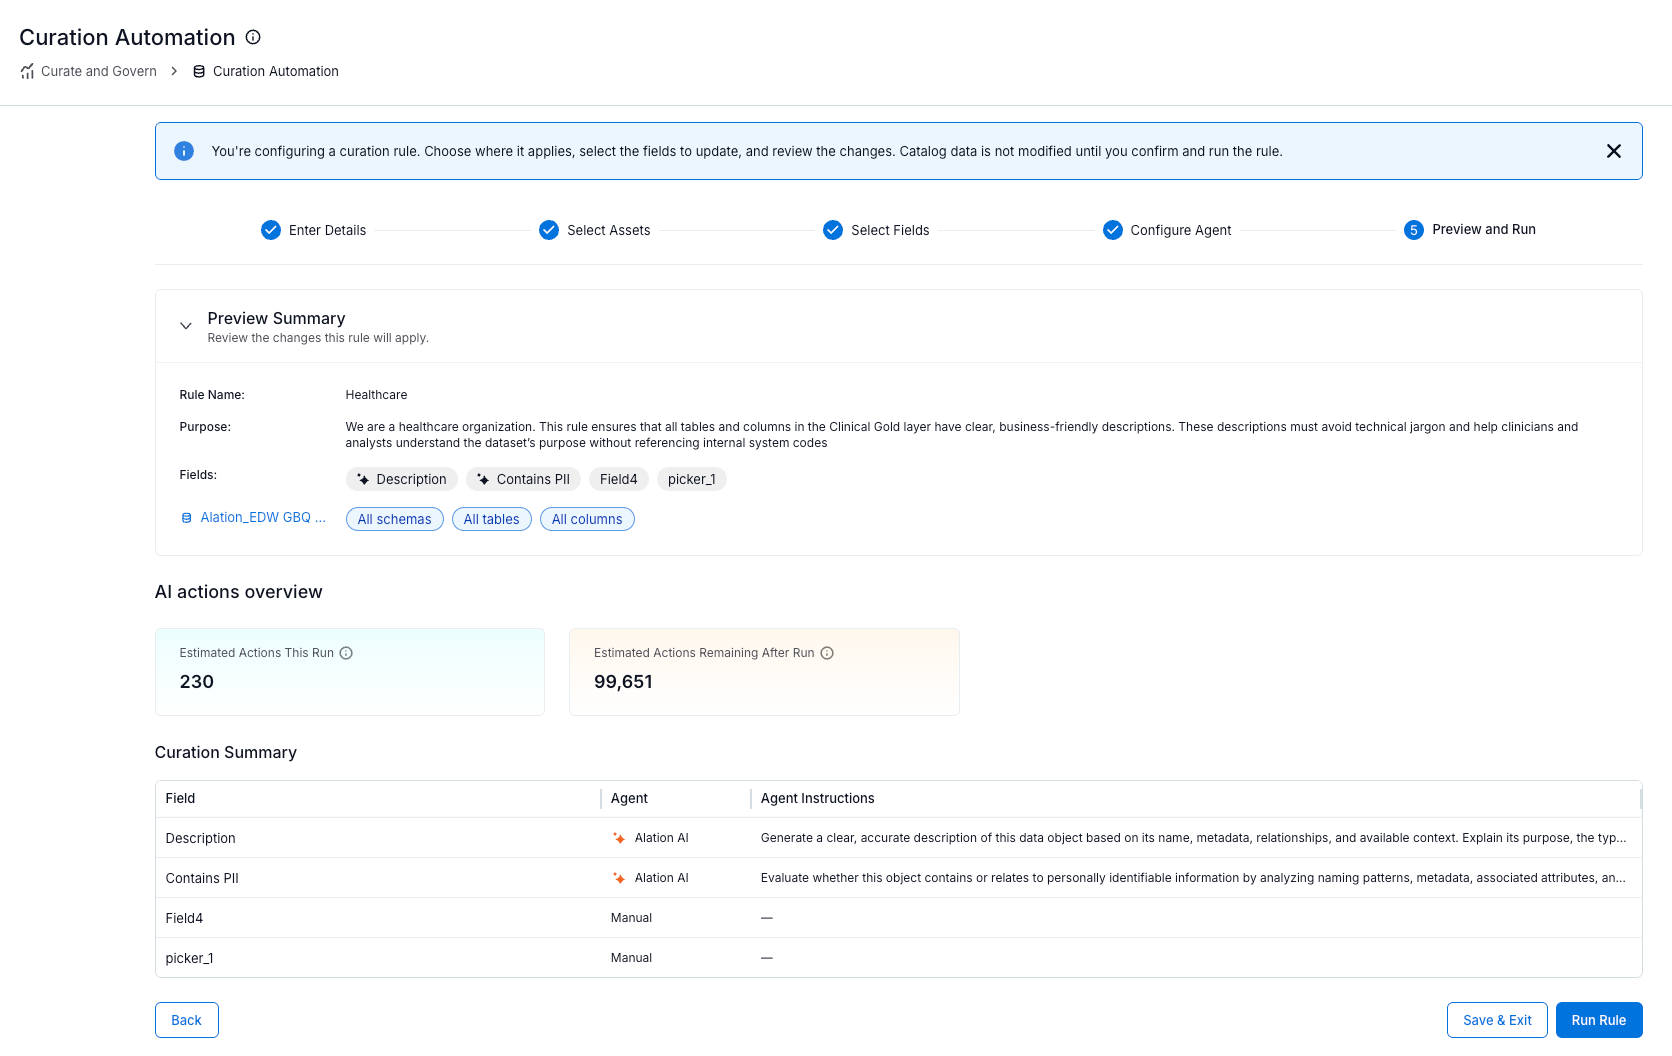
ACU tenants see Estimated AI Fields for This Run, Estimated ACU Cost for This Run, and Estimated ACU Balance After Run.
(Optional) Under Advanced Settings, configure notifications for this rule. Turn on Enable Notifications, then choose who is notified when the rule runs:
Users: Specific users you add. Click Add User to select them.
Stewards: Stewards assigned to the objects in scope. Turn on the Notify Stewards toggle to notify them.
Watchers: Users watching the objects in scope. Turn on the Notify Watchers toggle to notify them.
When the rule runs, recipients receive notifications in My Inbox under Updates and in their daily digest email. Curation Automation sends two types of notifications: rule execution status (sent when the run finishes and reporting its outcome with a Status such as SUCCESS) and field value changes (listing the objects that the run updated with new values). For details on viewing notifications and the daily digest, see Using Your Inbox.
(Optional) Schedule the rule to run automatically. In the Schedule section, turn on Enable schedule run, then:
Select a frequency and set when the rule runs:
Daily: Select the hour.
Weekly: Under Select days, select one or more days of the week, then select the hour.
Monthly: Select the day of the month, then select the hour.
Review the schedule summary, for example, Runs daily at 12:00 AM (GMT+05:30) Asia/Calcutta.
Note
Scheduled times are stored in UTC and do not adjust for daylight saving time (DST), so the displayed local time can shift by 1 hour if your time zone observes DST.
Scheduled rules run only when there are sufficient Curation AI actions or ACU credits remaining on your site. If there are not enough, the run is logged as Skipped with a reason, the schedule remains active, and Alation retries at the next scheduled time. No report is available for skipped runs.
For more information on enabling or disabling scheduling from the rule list, see Schedule a Curation Rule.
Save the rule:
Click Save & Exit to save the rule and its schedule. The rule runs at the next scheduled time.
Click Save & Run to save the rule and start a run immediately.
Before a manual run begins, a confirmation dialog displays the estimated consumption of AI actions or ACUs based on your entitlement type. If you do not have enough AI actions or ACU balance to run the rule, Alation displays the Insufficient AI Actions or Insufficient ACU Balance dialog, does not start the run, and saves the rule.
Running the rule takes some time, and the status is displayed on the Curation Automation page. You can click your rule from the Curation Automation page to view the execution report, metrics, and the run history. The following screenshot shows the Rule Execution Report page after a rule has run.

Suggest or Improve Instructions with AI
Before you run a rule, use AI to review and refine the rule’s Purpose (Step 2: Define Your Rule) or a field instruction (Step 4: Select Fields). A suggested rewrite streams into the field with optional writing guidance to help you produce consistent, accurate results.
To use AI to suggest or improve instructions:
In Step 2: Define Your Rule <ca-step2-define-rule>, click Suggest instructions or Improve instructions next to the Purpose field, or in Step 4: Select Fields <ca-select-fields>, click Suggest instructions or Improve instructions next to the Agent Instructions field.
The button label depends on whether the field already has content:
Suggest instructions: Shown when the field is empty. Generates a starter instruction.
Improve instructions: Shown when the field has content. Refines what you wrote.
A suggestion streams into the field. When the suggestion is complete, a message confirms that AI improved the instruction.
Review the suggestion and do one of the following:
Click Accept to apply the suggested text. You can edit it later, if required.
Click Reject to discard the suggestion and keep your original text.
The suggestion may also include the following advisory guidance, which is optional and never blocks you:
A Consider further enriching writing suggestion, with an example, to make the instruction effective. Click Show more to expand the section.
A feasibility notice when an instruction for fields, such as
TitleorDescription, asks for a value that is unlikely to be reliably determined from catalog metadata alone. Refine the wording or add context.You do not see this notice for picker and multi-select picker fields, because their values come from a predefined list of options.
An Attach a reference document suggestion when the instruction refers to external knowledge, such as a policy or standard. If a relevant document is already attached, the suggestion does not appear; if the attached document is not relevant, a prompt to replace it appears. To attach a document, see Step 4: Select Fields.
For an empty Purpose, a clarifying question may also appear along with the starter suggestion to help you describe the rule’s intent.
Note
You must accept or reject a suggestion before you can continue to the next step.
This assistance is always available. It does not consume AI actions or ACU credits, and it never blocks you from authoring or running a rule.
Review the Execution Report
After a rule runs, the Rule Execution Report provides a detailed summary of its performance and outcome. The Metrics section shows the number of assets curated by the rule. See Understand the Curation Automation Metrics.
Note
If you run a rule but lack permission to edit some objects or fields, Curation Automation skips them. The Rule Execution Report lists each skipped object with a reason indicating that you lacked permission to edit it, and skipped objects do not consume a curation action. For details, see Configure Permissions for Curation Automation.
The Rule Execution Report page header includes the Edit Rule and Run Now buttons. Use these to update the rule or start a new run without returning to the Curation Automation page. For details, see Edit a Curation Rule and Rerun a Rule.
To view the latest execution report later, in the Actions column of your rule on the Curation Automation page, click the three dots and select View Report.
Download a Run Report
Click Download full Report to download the latest run report as a CSV file. The report includes the objects involved, data source name, fields, old and new values, and whether AI agents applied the values. After downloading, filter by confidence tier to identify fields that were skipped. Low and Medium confidence results indicate where catalog signals are thin or field instructions need refinement.
To view historic runs, select the Run History tab on the Rule Execution Report page. The tab lists all previous runs of the rule, including the run date, status, and number of assets curated. Click on the download icon to download a report for a specific run.
Note
You can download reports only for rules you created. For a rule created by another user, the Download button is disabled and shows the tooltip You can only download reports for rules you created. Server Admins and Catalog Admins can download reports for any rule.
Use Custom Agents for AI-Generated Fields
To further refine AI-generated fields, you can select a custom AI agent created in Agent Studio.
To select a custom AI agent:
Click the edit icon on a field row to open the edit modal.
From the Agent dropdown, select one of the following:
Built-in Agents: System-provided agents, such as Curation Automation (default).
Custom Agents: User-defined agents created in Agent Studio and tagged for curation automation.
Note
To create a custom agent, duplicate and customize the native Curation Automation agent template in Agent Studio. For more information on creating custom agents, see Agent Studio Documentation.
Update the Agent Instructions to provide specific context for how the agent should generate values for this field.
Click Re-generate to preview the new values and confidence scores.
Click Save to apply your changes.
Note
Each field in a curation rule can use a different agent. The agent name appears in the Agent column of the preview table in Step 5: Configure Agents and in the Rule Preview table in Step 6: Preview and Run the Rule.
Review Rule Attribution
After a curation rule runs, Alation marks catalog field values that were applied by Curation Automation with a sparkle icon. A sparkle icon indicates that a value was AI-generated. You can review the exact rule that applied it.
When you hover over the icon, a tooltip shows the following information:
The feature that set the value.
The name of the specific curation rule.
If no sparkle icon appears, a user set the value manually, or a manual curation rule applied it.
To view the full attribution in field version history, open the field’s version history. For details, see Attribution in Field Version History.
Edit a Curation Rule
After you create a rule, you can edit it at any time. You can edit a rule from the Curation Automation page or the Rule Execution Report page.
To edit a rule from the Curation Automation page:
Click on the Curate and Govern icon from the left navigation panel of Alation user interface.
From the Governance page, click on the Curation Automation option from the Curate section.
Under the Actions column of the rule you want to edit, click on the three dots and select Edit Rule.
Edit the required rule details, such as the title and purpose, and click Next: Select Assets.
In the Select Assets section, click Add Scope to add a new scope or click on the existing scope to make changes to it. For details, see Create a Curation Rule.
Click Confirm All Scopes.
On the Field Selection page, add, edit, or delete fields. For details, see Create a Curation Rule.
If the rule has scheduling enabled and you set a field to Always replace (overwrite or append the existing value), the Scheduling is Enabled dialog appears. It explains that every scheduled run re-curates the field, even if it already has a value. Click Proceed to keep the setting, or click Cancel and disable scheduling first.
Click Next: Preview Changes.
On the Rule Preview page, verify the changes applied. You can select a data asset for preview: data source: schema, table, or column; file system source: directory, file, or file attribute. Review the before and after changes.
After verifying, click Save and Run.
To edit a rule from the Rule Execution Report page:
Open the Rule Execution Report page for the rule. For details, see Create a Curation Rule.
Click Edit Rule. Alation opens Step 1: Enter Details in edit mode and shows the existing values.
Update the rule details across the steps, as required. Follow the same procedure described in Create a Curation Rule.
Rerun a Rule
You can manually rerun an existing rule at any time to:
Apply logic to new assets added to the catalog that match the rule’s scope and filters.
Update existing assets after making changes to the rule logic or configurations.
Refresh the curation logic whenever a manual sync is required.
Every time you rerun a rule, Alation processes and updates only the assets or fields that have been added or modified.
You can rerun a rule from the Curation Automation page or directly from the Rule Execution Report page.
To rerun a rule from the Curation Automation page:
Click on the Curate and Govern icon from the left navigation panel of Alation user interface.
From the Governance page, click on the Curation Automation option from the Curate section.
Go to the Curation Rules tab.
Under the Actions column of the rule you want to run, click on the three dots and select Run.
Running a rule takes some time. The status is displayed on the Curation Automation page. You can click your rule from the Curation Automation page to view the execution report and the run history.
To rerun a rule from the Rule Execution Report page:
Open the Rule Execution Report page for the rule.
Click Run Now in the page header. Alation opens the Rule Preview page, where you review the curation actions (fields to update, scope, and AI actions) before you start the run.
Note
The Run Now button is unavailable while an execution is already in progress for this rule.
After verifying the preview, click Save and Run to start the run.
Note
You can run only saved rules.
Schedule a Curation Rule
You can schedule a curation rule to run automatically on a recurring basis, instead of running it manually each time. You configure the schedule in the Schedule section of Step 6: Preview and Run the Rule.
Rules that have scheduling enabled show a Scheduled badge in the Status column of the Curation Rules list on the Curation Automation page.
To enable or disable scheduling from the rule list:
Click the Curate and Govern icon in the left navigation panel, then select Curation Automation from the Curate section.
On the Curation Rules tab, under the Actions column of the rule, click the three dots and select one of the following:
Enable scheduling: For a rule that does not have a schedule.
Disable scheduling: For a rule that already has a schedule.
Both options open the Preview and Run step, where you configure or update the schedule.
Click Save & Exit or Save & Run to save your changes.
Scheduling and Field Overwrite Settings
A scheduled run re-applies the rule’s field settings every time it runs. If a field is set to replace or append existing values instead of filling only empty values, the scheduled run re-curates that field even when it already has a value. Alation warns you about this in two places:
When you enable scheduling for a rule that has fields set to overwrite or append, the Fields Will Be Overwritten dialog appears. Click Enable Scheduling to proceed, or cancel and change the field settings to fill only empty values first.
When you set a field to overwrite or append while scheduling is already enabled (in Step 4: Select Fields), the Scheduling is Enabled dialog appears. Click Proceed to keep the setting, or cancel and disable scheduling first.
Delete a Curation Rule
Follow these steps to permanently remove an existing curation rule from the Curation Automation dashboard:
Click on the Curate and Govern icon from the left navigation panel of Alation user interface.
From the Governance page, select the Curation Automation option from the Curate section.
Under the Actions column of the rule you want to delete, click on the three dots and select Delete.
Click on the Delete Rule button.