
Configure Connection to BI Source
Alation Cloud Service Applies to Alation Cloud Service instances of Alation
Customer Managed Applies to customer-managed instances of Alation
Core Connector Core connectors are included with all Alation platform tiers (subject to each tier’s connector limits) and are fully supported by Alation.
After you install the Tableau OCF connector, you must configure the connection to the Tableau BI source.
The various steps involved in configuring the Tableau BI source connection setting are:

Provide Access
You can configure the visibility of a BI source and its child objects such as Folders and Reports on the Access tab of the settings page.
Configure BI Source Visibility
Applies from release 2023.3.5
On the Access tab, follow these steps to set the BI source visibility:
Select one of the following options for setting privacy level:
Public BI Server—The BI source will be visible to all users of the catalog.
Private BI Server—The BI Source will be visible to users who have been granted the BI Server Admin or Viewer permissions. It will be hidden for all other users.
Add one or more BI Server Admins or Viewers in the User Access section if required.
For more information on access to BI sources, see Configure Access to OCF BI Sources.
Configure BI Folder and Report Visibility
Applies from release 2024.1.4
On the Settings under a BI Folder or Report, follow these steps to set visibility:
Check the option Enable explicit permission to change access permission defined at the parent level object.
This enables and allows permissions at the object level. By default, the access permissions are inherited from the parent level and are not editable.
Select one of the following options to set a privacy level:
Public—The BI folder or report will be visible to all users of the catalog.

Private—The BI folder or report will be visible to users that have been granted the BI Server Admin or Viewer permissions. It will be hidden for all other users.

Add one or more BI Server Admins or Viewers in the User Access section if required.
For more information on how to enable the feature and configure access to a folder or report, see Configure Access to OCF BI Folders and Reports.
Connect to Data Source
To connect to the BI source, you must perform these steps:
Configure Proxy Settings (Optional)
Important
The Alation user interface displays standard configuration settings for credentials and connection information stored in the Alation database. If your organization has configured Azure KeyVault or AWS Secrets Manager to hold such information, the user interface will change to include the following buttons adjacent to the respective fields:

By default, you see the user interface for Standard. In the case of Vault, instead of the actual credential information, you must select the source and provide the corresponding key. For details, see Configure Secrets for OCF Connector Settings.
Provide the Tableau URI
Before using the Tableau URI format, understand the Tableau URI format.
URI Format
Use the URL of Tableau Server or Tableau Cloud.
Example: https://tableau2021.alationcatalog.com
Provide the Tableau URI in Alation
To provide the Tableau URI in the Alation UI, perform these steps:
From Alation version 2024.1.2 and connector version 1.9.0
On the Settings page of your Tableau BI source, go to the General Settings tab.
In the Provide the Tableau URI section, enter the Tableau URI.
Click Save.
On the Settings page of your Tableau BI source, go to the General Settings tab.
Go to the Connector Settings > Server Connection section enter the Tableau URI.
Configure Authentication
Alation supports the following authentication types for the Tableau BI source:
Basic authentication (username and password)
Active Directory (username and password)
Personal Access Token
Unified Access Token (UAT) — Tableau Cloud only, available from connector version 1.14.0
SSL authentication
Tableau Server
Configure authentication for Tableau Server:
From Alation version 2024.1.2 and connector version 1.9.0
On the Settings page of Tableau BI source, go to the General Settings tab.
In the Configure authentication step, Choose Tableau Server.
Basic Authentication:
To configure Basic authentication, perform these steps:
In the Configure authentication step, click on the Basic tab.
Provide the service account Username, Password and the Site ID(s) (optional) separated by commas.
Note
If the Site ID field is blank, connector will extract all the sites. To extract only the default site, use selective extraction by selecting the appropriate projects.
To use SSL with Basic authentication, turn on the Upload SSL Certificate toggle, and upload the SSL certificate.
Click Save.
Personal Access Token:
To configure Personal Access Token authentication, perform these steps:
In the Configure authentication step, click on the Personal Access Token tab.
Provide the Token name, Token secret and the Site ID(s) (optional) separated by commas.
Note
If the Site ID field is blank, connector will extract all the sites. To extract only the default site, use selective extraction by selecting the appropriate projects.
To use SSL with Personal Access Token authentication, turn on the Upload SSL Certificate toggle, and upload the SSL certificate.
Click Save.
On the Settings page of your Tableau BI source, go to the General Settings tab.
Go to the Connector Settings > Server Connection.
Basic Authentication:
To configure Basic authentication, perform these steps:
Provide the service account Username, Password and the Site ID(s) (optional) separated by commas.
Select Tableau Online/Only Extract from SiteIDs above checkbox to limit extraction from Tableau Server to the specified site IDs.
If connecting over SSL, upload the SSL certificate for Tableau Server in the Server SSL Certificate field.
Click Save.
Personal Access Token:
To configure Personal Access Token authentication, perform these steps:
Provide the Token name, Token secret and the Site ID(s) (optional) separated by commas.
Select Tableau Online/Only Extract from SiteIDs above checkbox.
If connecting over SSL, upload the SSL certificate for Tableau Server in the Server SSL Certificate field.
Click Save.
Tableau Cloud
Configure authentication for Tableau Cloud:
From connector version 1.14.0, Tableau Cloud supports both Personal Access Token and Unified Access Token (UAT) authentication.
Personal Access Token (default):
To configure Personal Access Token authentication, perform these steps:
On the Settings page of Tableau BI source, go to the General Settings tab.
In the Configure authentication step, select Tableau Cloud.
Provide the Token name, Token secret and the Site ID(s) separated by commas.
To use SSL with Personal Access Token authentication, turn on the Upload SSL Certificate toggle, and upload the SSL certificate.
Click Save.
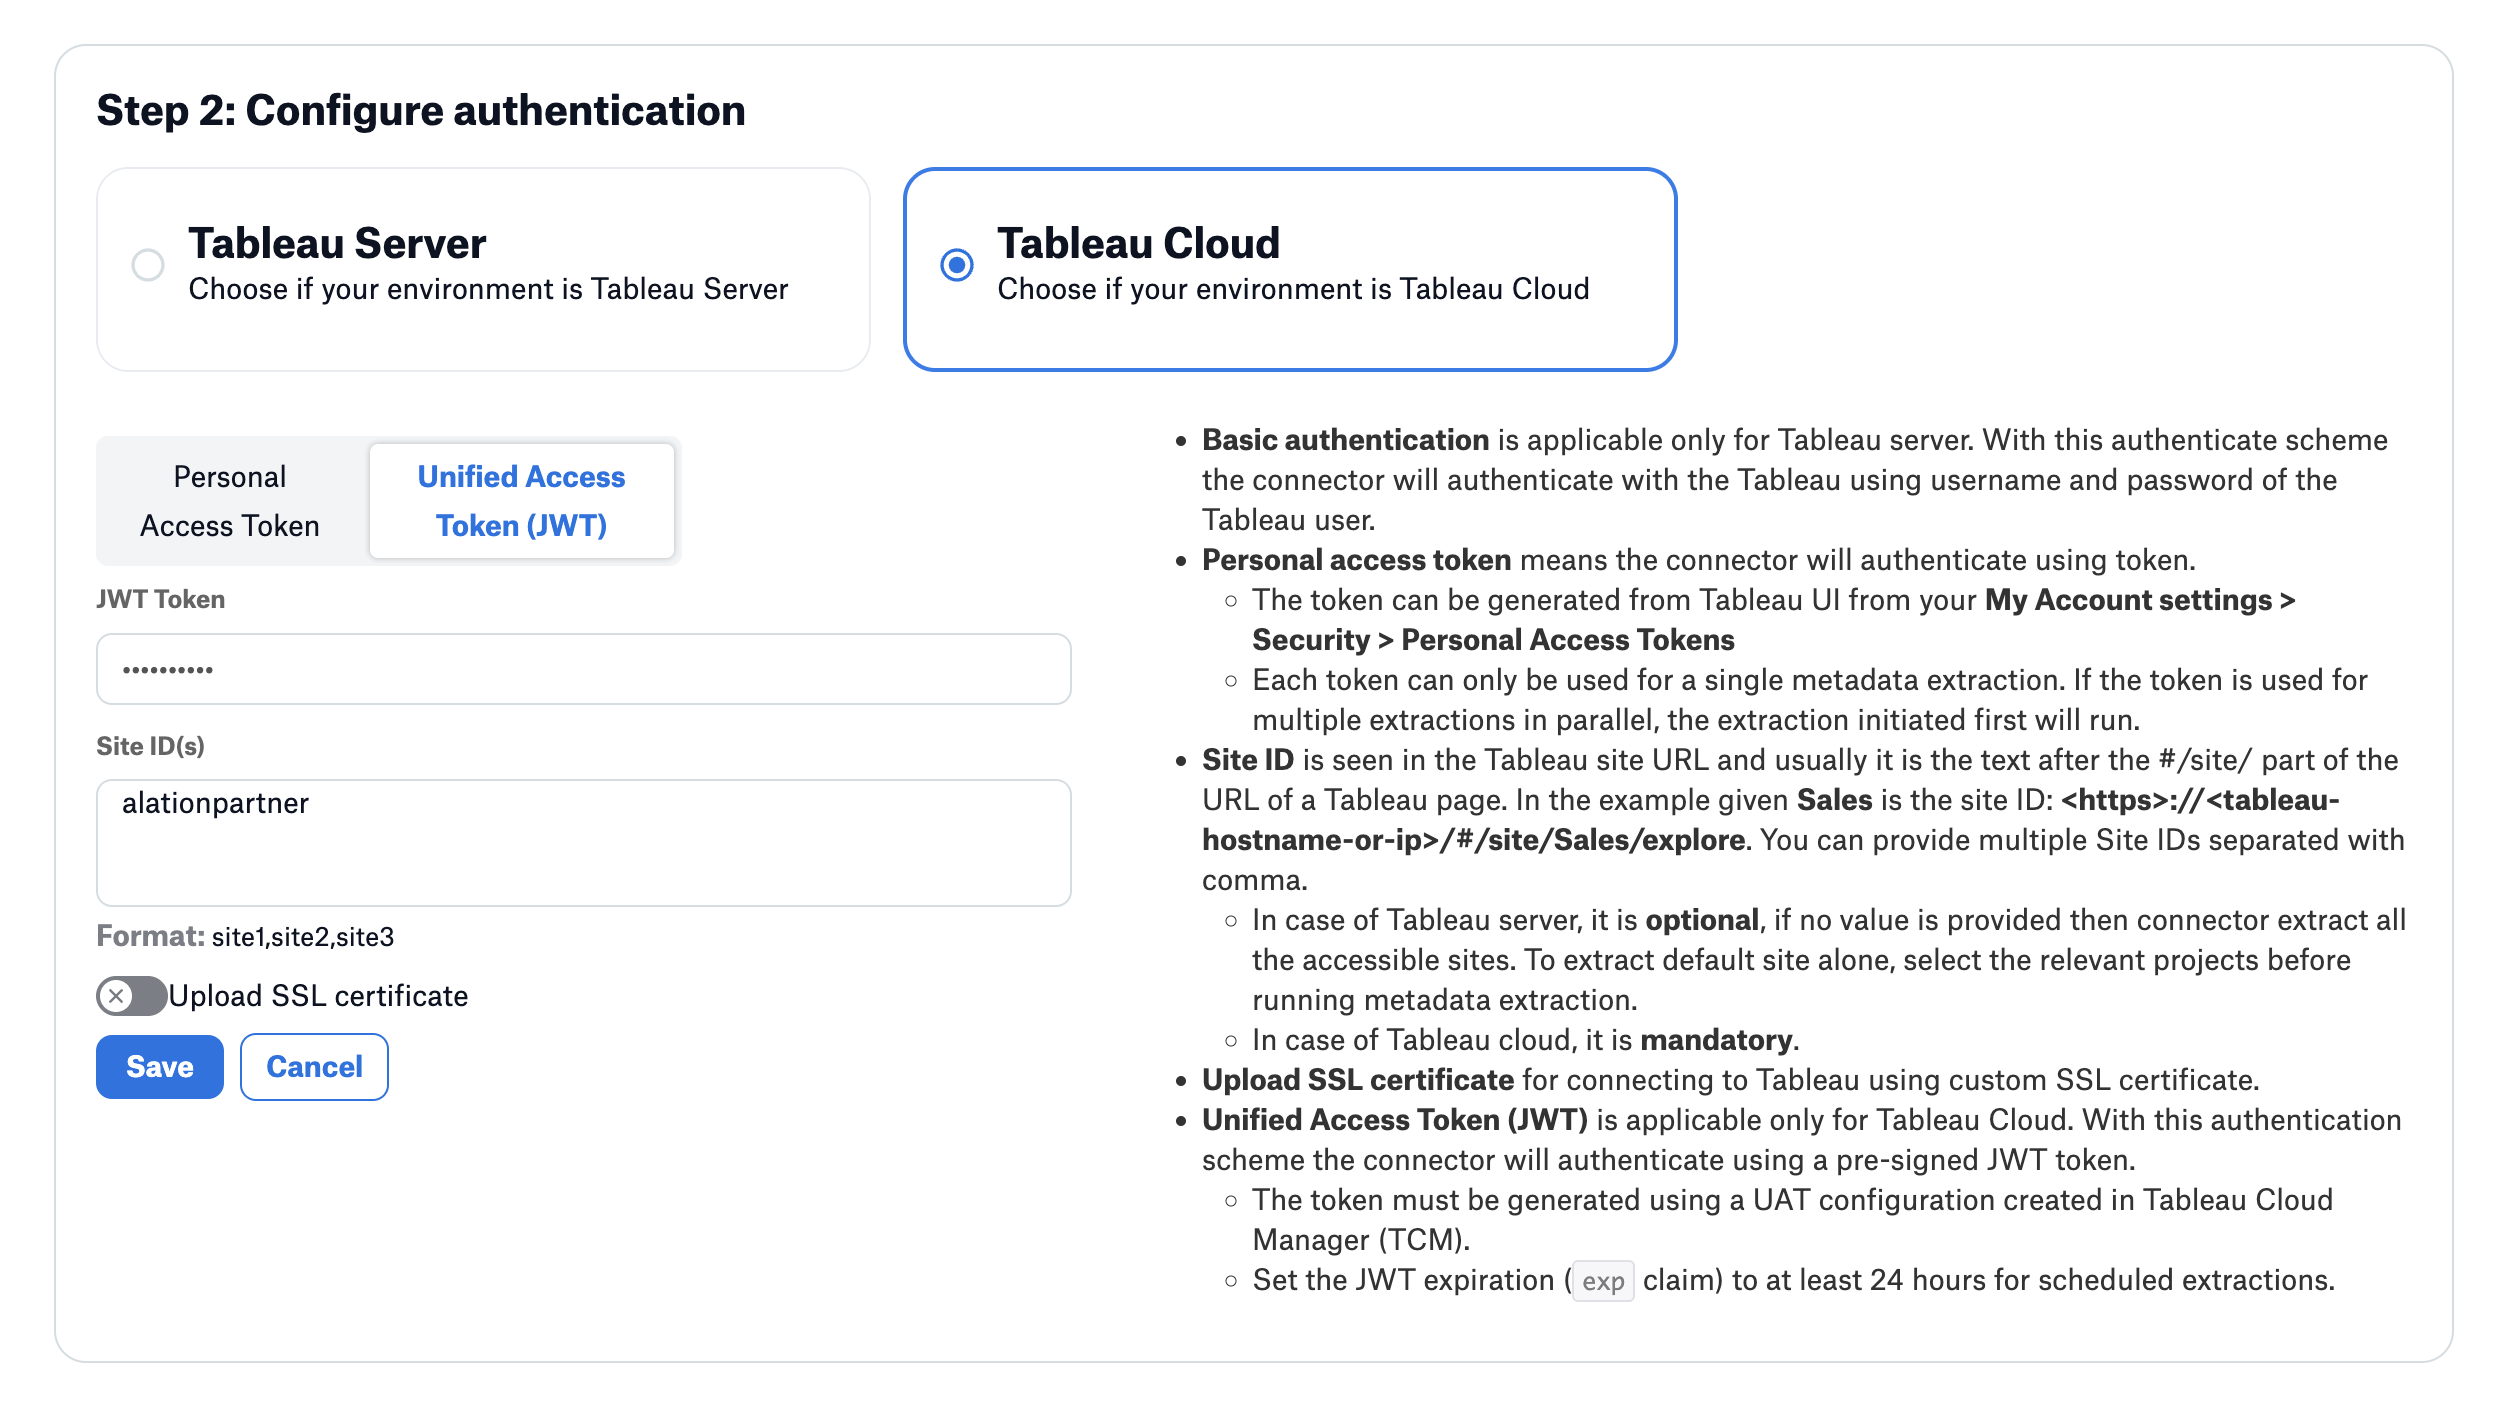
Unified Access Token (UAT):
To configure UAT authentication, perform these steps:
On the Settings page of Tableau BI source, go to the General Settings tab.
In the Configure authentication step, select Tableau Cloud.
Select the Unified Access Token (JWT) tab.
Provide the signed JWT token generated as part of the UAT prerequisites.
Provide the Site ID(s) separated by commas.
To use SSL, turn on the Upload SSL Certificate toggle, and upload the SSL certificate.
Click Save.
Note
JWT tokens have a finite expiry. When the token expires, you must generate a new JWT and update the connector configuration. To update the JWT, return to the General Settings tab, select the Unified Access Token (JWT) tab, paste the new token, and click Save. The connector will automatically re-authenticate using the stored JWT when the Tableau session token expires (every 120 minutes), as long as the JWT itself has not expired.
Important
UAT requires Tableau REST API version 3.27 or later. The connector validates the API version during connection setup and will display an error if the Tableau Cloud instance does not support UAT. For details on setting up UAT in Tableau Cloud Manager, refer to Tableau’s UAT documentation.
From Alation version 2024.1.2 and connector version 1.9.0
Note
Only Personal Access Token authentication is supported for Tableau Cloud in these connector versions.
On the Settings page of Tableau BI source, go to the General Settings tab.
In the Configure authentication step, Choose Tableau Cloud.
Provide the Token name, Token secret and the Site ID(s) separated by commas.
To use SSL with Personal Access Token authentication, turn on the Upload SSL Certificate toggle, and upload the SSL certificate.
Click Save.
On the Settings page of your Tableau BI source, go to the General Settings tab.
Go to the Connector Settings > Server Connection.
Provide the Token name, Token secret and the Site ID(s) separated by commas.
Select Tableau Online/Only Extract from SiteIDs above checkbox.
If connecting over SSL, upload the SSL certificate for Tableau Server in the Server SSL Certificate field.
Click Save.
Configure Proxy Settings
Note
This step is optional.
If you connect Tableau Server or Tableau Cloud through a proxy, configure the proxy connection:
Note
Proxy configuration is available in Alation version 2024.1.4 and Tableau connector version 1.16.0 or later.
Kerberos proxy authentication, HTTPS proxy endpoints, and additional proxy CA bundles require Tableau connector version 1.17.0 or later.
On the Settings page of your BI source, go to the General Settings tab.
In the Proxy configuration (optional) section, enter the following details:
Proxy configuration settings¶ Parameter
Description
Proxy URL
Specify the HTTP or HTTPS proxy endpoint. Include the scheme and hostname, for example,
http://proxy.example.comorhttps://proxy.example.com. Leave this field blank to connect directly without a proxy.Proxy port
Specify a port from
1through65535. If you leave this field blank, the connector uses port80for an HTTP proxy or port443for an HTTPS proxy.Proxy authentication type
Select one of these authentication types:
No Auth: The proxy doesn’t require authentication.
Basic: The proxy requires a username and password.
Kerberos: The proxy requires Kerberos or SPNEGO authentication. Provide a username, password, Kerberos realm, and krb5.conf file.
Proxy username
Specify the proxy username for Basic or Kerberos authentication.
Proxy password
Specify the proxy password for Basic or Kerberos authentication.
Kerberos realm
Specify the Kerberos realm, for example,
CORP.EXAMPLE.COM.Kerberos configuration
Upload the krb5.conf file that contains the Kerberos realm and Key Distribution Center (KDC) settings. Obtain this file from your Kerberos or proxy administrator, or copy it from a Kerberos-enabled host, such as /etc/krb5.conf. The file must be smaller than 1 MB.
Upload additional proxy CA bundle
Enable this option when an HTTPS proxy endpoint uses an internally signed certificate or when the proxy performs TLS inspection and re-signs Tableau certificates.
Additional proxy CA bundle
Upload the complete CA chain as a PEM- or DER-encoded X.509 certificate bundle. The bundle can include both the HTTPS proxy endpoint CA and the TLS inspection CA. The file must be smaller than 5 MB.
No Proxy URIs
Enter hostnames that should bypass the proxy. These hosts connect directly and don’t use proxy authentication or the additional proxy CA bundle. Don’t include a scheme or port. Separate multiple hostnames with a pipe character, for example,
localhost|127.0.0.1|*.example.com.Note
The proxy configuration applies to both Tableau REST and GraphQL requests, including connection tests and metadata extraction.
The additional proxy CA bundle extends the default trusted CAs. For TLS inspection, enable Tableau certificate verification for the uploaded CA to verify re-signed Tableau certificates. Uploading the additional proxy CA bundle doesn’t enable Tableau certificate verification by itself.
Warning
Basic authentication sends reusable proxy credentials over the proxy hop. Use an HTTPS proxy endpoint to encrypt this hop. Kerberos uses SPNEGO tokens and doesn’t send the user’s password in the
Proxy-Authorizationheader.Note
For long metadata extraction jobs using Kerberos, confirm the Kerberos ticket lifetime is long enough for the extraction to complete. The connector doesn’t renew a ticket during an active operation. The next operation signs in again when required.
Click Save.
Test the Connection
The connection test checks BI source connectivity. Alation uses the Tableau URI to connect to the BI source and to confirm when the connection is established.
After specifying the Tableau URI and configuring authentication, test the connection.
To validate the network connectivity, go to General Settings > Test Connection of the Settings page of your Tableau BI source and click Test.
A dialog box appears confirming the status of the connection test.
Configure Additional Connection Settings
Apart from the mandatory configurations that you perform to connect to the BI source in the General Settings tab, you can configure the following additional settings:
Configure BI Server Lookup URI
Specify the URI of the BI server to redirect users to BI objects from the respective catalog pages using the Connector link.
From Alation version 2024.1.2 and connector version 1.9.0
On the Settings page of Tableau BI source, go to the General Settings tab.
In Advance Settings (optional) section, provide the BI sever lookup URI.
On the Settings page of your Tableau BI source, go to the General Settings tab.
In Application Settings section, provide the BI server lookup URI in Server URI field.
Enable Automatic Lineage Generation
You can choose whether lineage for your data source is generated automatically during metadata extraction and query log ingestion.
To enable automatic lineage generation:
Go to General Settings > Advanced settings of the Settings page of your data source
Toggle Enable automatic lineage generation to on. When enabled, lineage is automatically generated during MDE.
To disable automatic lineage generation:
Toggle Enable automatic lineage generation to off. Disable this option if you prefer to create lineage manually or by using the API.
Note
Automatic lineage generation is enabled by default.
You can choose whether lineage for your data source is generated automatically during metadata extraction and query log ingestion.
To enable automatic lineage generation:
On the Settings page of your data source, navigate to General Settings > Application Settings.
Toggle Enable automatic lineage generation to on. When enabled, lineage is automatically generated during MDE.
To disable automatic lineage generation:
Toggle Enable automatic lineage generation to off. Disable this option if you prefer to create lineage manually or by using the API.
Note
Automatic lineage generation is enabled by default.
Cross-System Lineage:
Cross-System Lineage is to generate lineage between this Tableau BI source and any supported data source by this connector. To generate the cross-system Lineage, specify the host name and the port number of this BI source on the RDBMS connector’s General Settings > Application Settings > BI Connection Info field in the format mentioned below:
Host_Name:Port_Number
Example: adb-8443049157651279.19.azuredatabricks.net:443

Note
This image is from the supported data source General Settings page.
Configure Logging
To set the logging level for your PostgreSQL OCF data source logs, perform these steps:
For Alation version 2024.1.2 and connector version 1.9.0
On the Settings page of your Tableau OCF BI source, go to General Settings > Connector logs.
Select a logging level for the connector logs and click Save.
The available log levels are based on the Log4j framework.
On the Settings page of your PostgreSQL OCF data source, go to Logging configuration section of General Settings tab.
Select a logging level for the connector logs and click Save.
The available log levels are based on the Log4j framework.
Delete the BI Source
To delete the BI Source, refer Delete a BI Source.
Note
For Tableau OCF Connector version 1.9.0 and newer, the delete option will not be available on the Settings page of the BI source.