Get Started with Creating Data Products
Alation Cloud Service Applies to Alation Cloud Service instances of Alation
Designing your first data product may take some initial practice.
This topic walks you through the creation process step by step, helping you adopt the data product mindset and make confident configuration choices as you build and refine more data products over time.
We’ll review the main data product configuration options, and you’ll learn what each setting does and when to use it.
In this topic:
Understand a Data Product’s Structure
A data product is made up of metadata that defines its structure and purpose. When you create a data product, you configure these components to give consumers the context they need to understand the underlying data and how to use it.
Some data product components are required, while others are optional. The optional components are still important, but they often require a more advanced understanding of data product design. You can start by adding the required components and then enrich the data product over time by adding the optional ones.
Alation provides AI assistance to support you as you design data products. The data product editor includes the Data Products Builder Copilot: an AI-assisted tool that helps populate required and optional fields as you build out your data product.
A data product consists of several types of metadata that define its structure and usage:
Required data product metadata
Name
Description
Version
Owner
Owner email
Dataset metadata
Information about the dataset included in the data product
Instructions on how to request or obtain access to the dataset
Metric metadata
Definitions of metrics used to calculate values from the dataset
AI-powered Chat configuration (for supported data sources)
Chat enablement settings
Authentication configuration required to use chat
Let’s start by creating an example data product.
Step 1: Initiate Data Product Creation
You create data products in the Data Products App, which you can access from the left-side navigation.
To create a data product, you must have the appropriate permissions within the Data Products App. At a minimum, you need the App User role.
There are two ways to start creating a data product:
From App Navigation
Once you’re in the Data Products App, expand the left-side navigation panel.
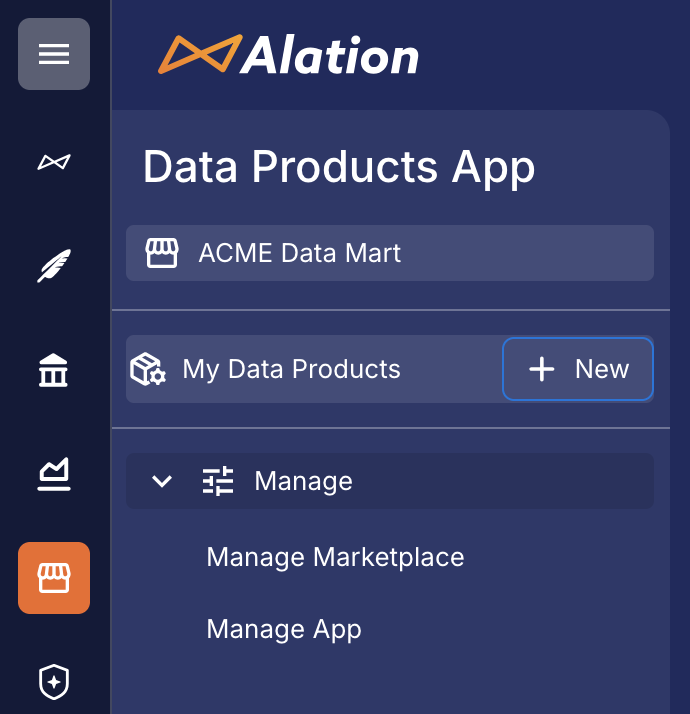
Click + New next to My Data Products. The data product editor opens.
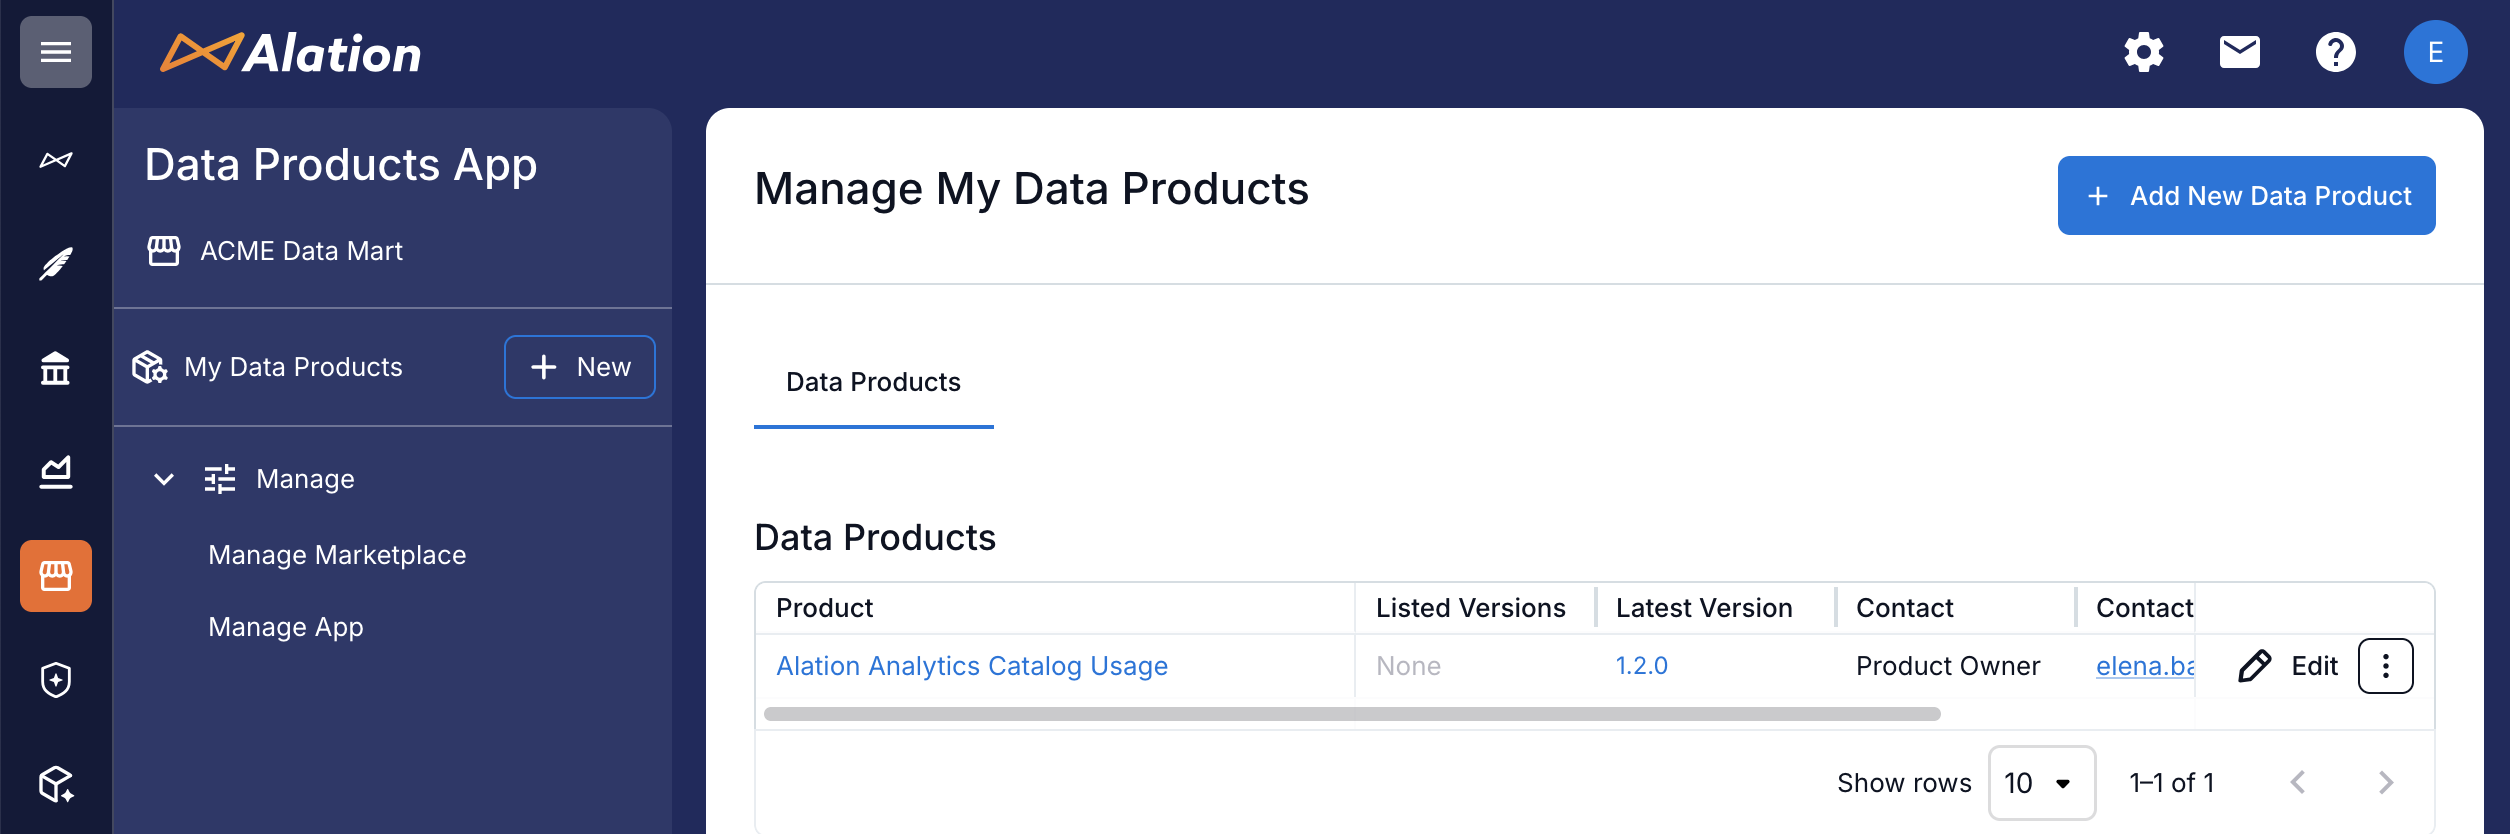
From Manage My Data Products
In the left-side navigation, click My Data Products. The Manage My Data Products page opens. If you haven’t created any data products yet, this page is empty. This page lists the data products you own or manage.
Click + Add New Data Product in the top-right corner. The data product editor opens.
Step 2: Add Basic Data Product Properties
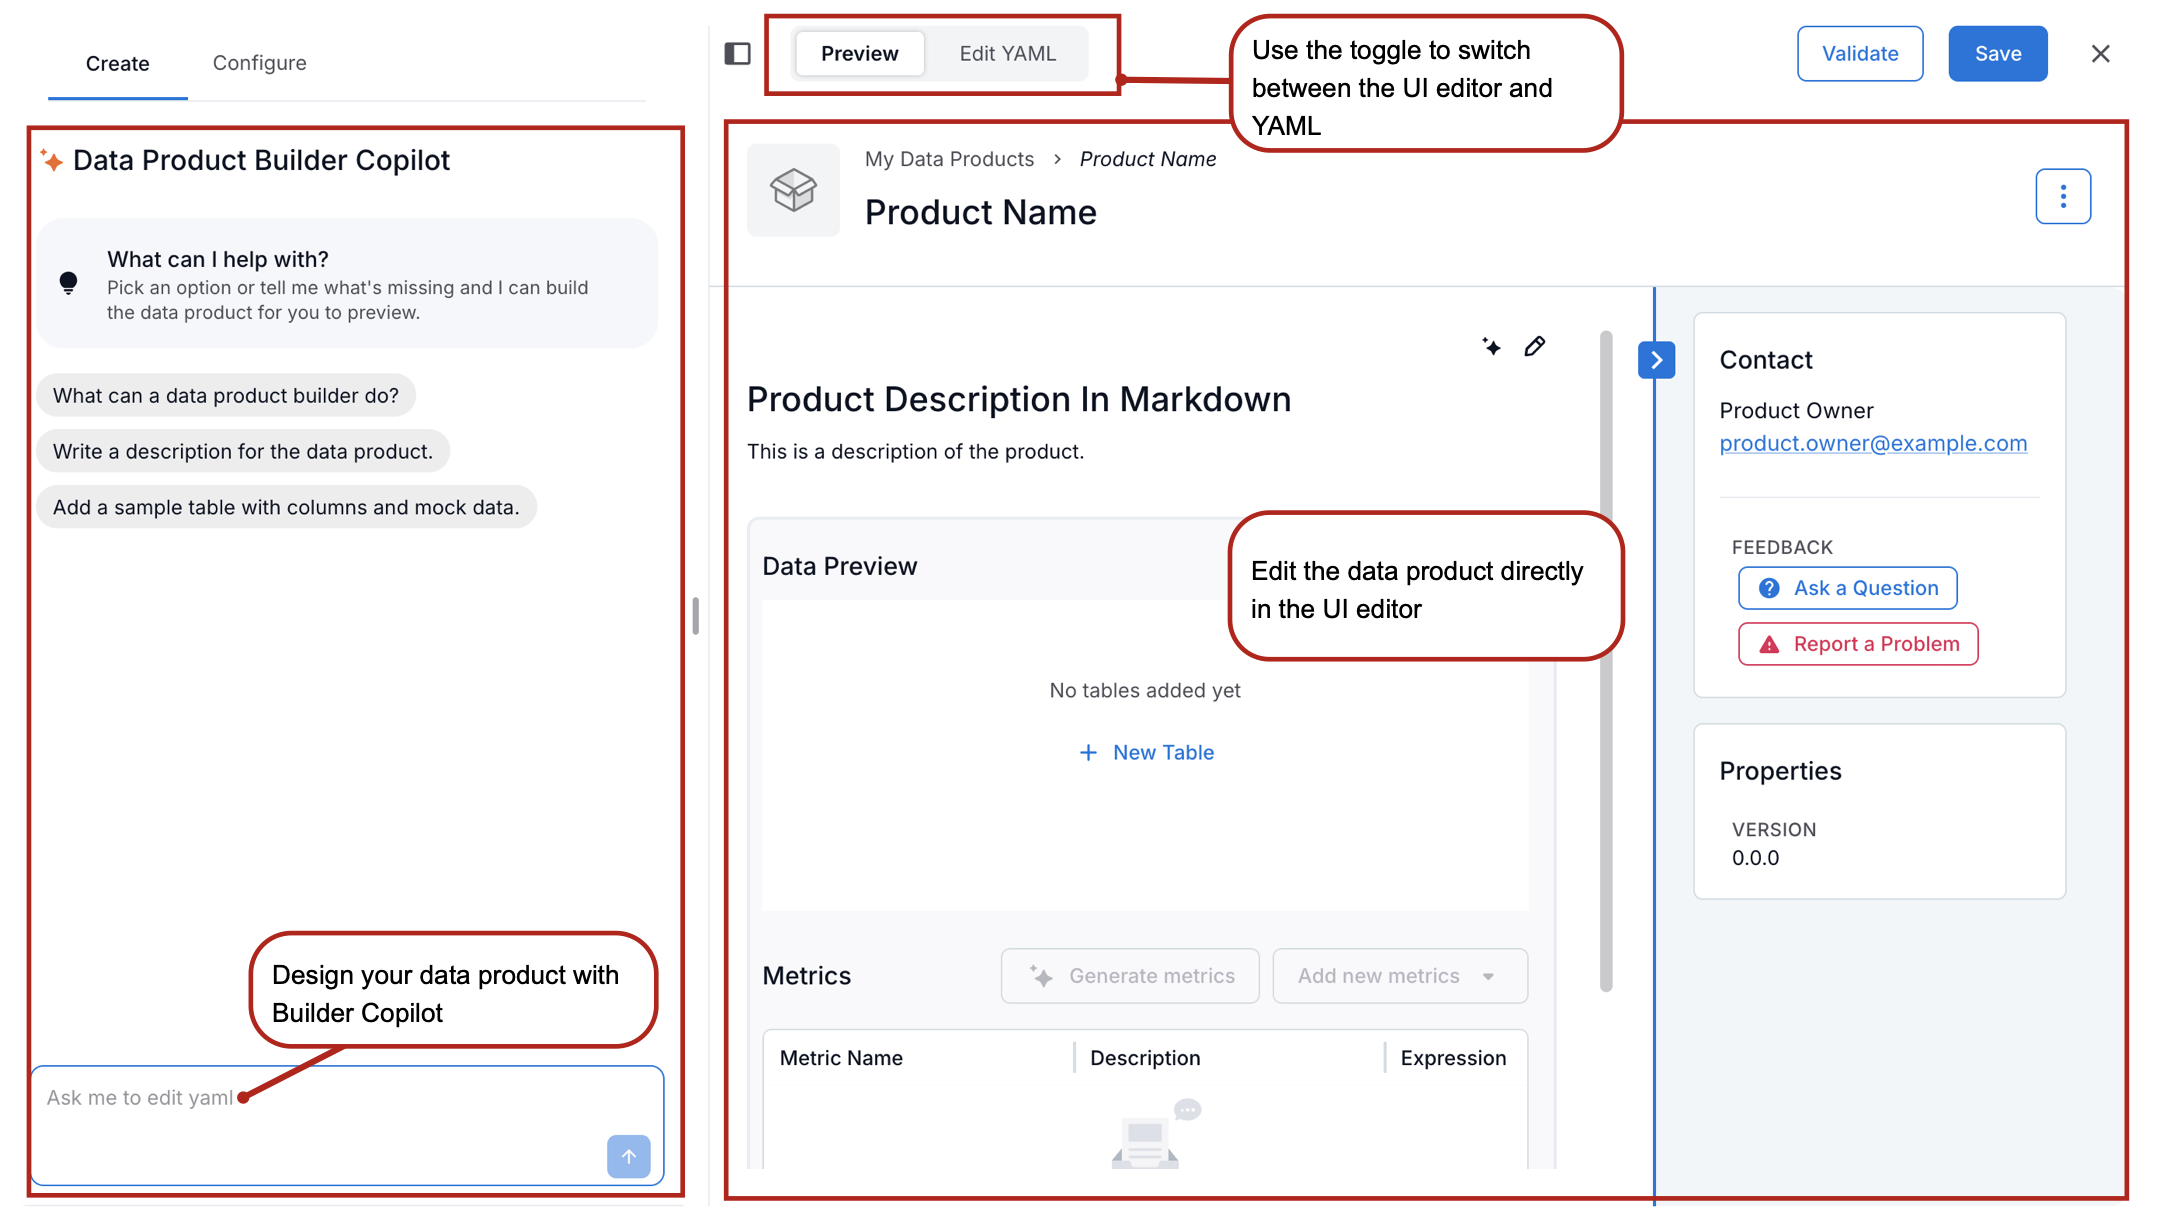
Data Product Editor Overview
When you open the data product editor, you see two main areas:
Data Products Builder Copilot on the left: an AI-assisted chat that helps you build and configure your data product.
The data product template in the main area, where you define the data product’s properties.
At the top of the editor, you see two toggles:
Preview: Displays the visual editor for configuring the data product. Toggle Preview to display the visual editor.
Edit YAML: Lets you view and edit the underlying YAML schema that defines the data product. Click Edit YAML to view the YAML specification of the data product.
Note
You can view the data product schema at https://<base_URL>/static/swagger/specs/data_products/product_schema.yaml. (The <base_URL> placeholder represents the base URL of your Alation instance.)
Saving Progress
As you build your data product, you can save your progress at any time by clicking Save in the top-right corner of the editor. You don’t need to complete everything in one session: save your changes and return later.
Add Basic Properties
Add Data Product Name
At the top of the editor, click the data product name placeholder (Product Name). The field becomes editable. Enter a name for your data product. After entering the name, click outside the name field to save it.
Add Description
To add a description for the data product:
Click the Edit icon (the pencil) to the right of the Product Description in Markdown placeholder. The field becomes editable.
Enter a description using Markdown-supported formatting. The description field supports long-form content, so you can capture as much detail as needed. Use the formatting toolbar to structure and format your content for readability. Use the description to clearly explain:
The purpose of the data product
The business context it supports
Relevant definitions or assumptions
Key usage information
Focus on the information that data product consumers need. What information would be helpful to understand what this data product is for and how to use it effectively when viewing it in the Marketplace? You can also include:
Supported analytical use cases
Example questions the data product can answer
Any other details that help set expectations
When done, click Save in the top-right corner of the description field.
Improve the Description with AI
You can start with a rough draft of the description and use AI to refine it. Click the AI icon next to the Edit Description icon to generate an improved version. Review the suggested changes and save them if they meet your needs. Otherwise, click Cancel to keep the previous version.
Add Owner, Contact, and Version Information
Next, add the Owner, Contact, and Version information for the data product. This information helps data product consumers understand who to contact with questions or feedback.
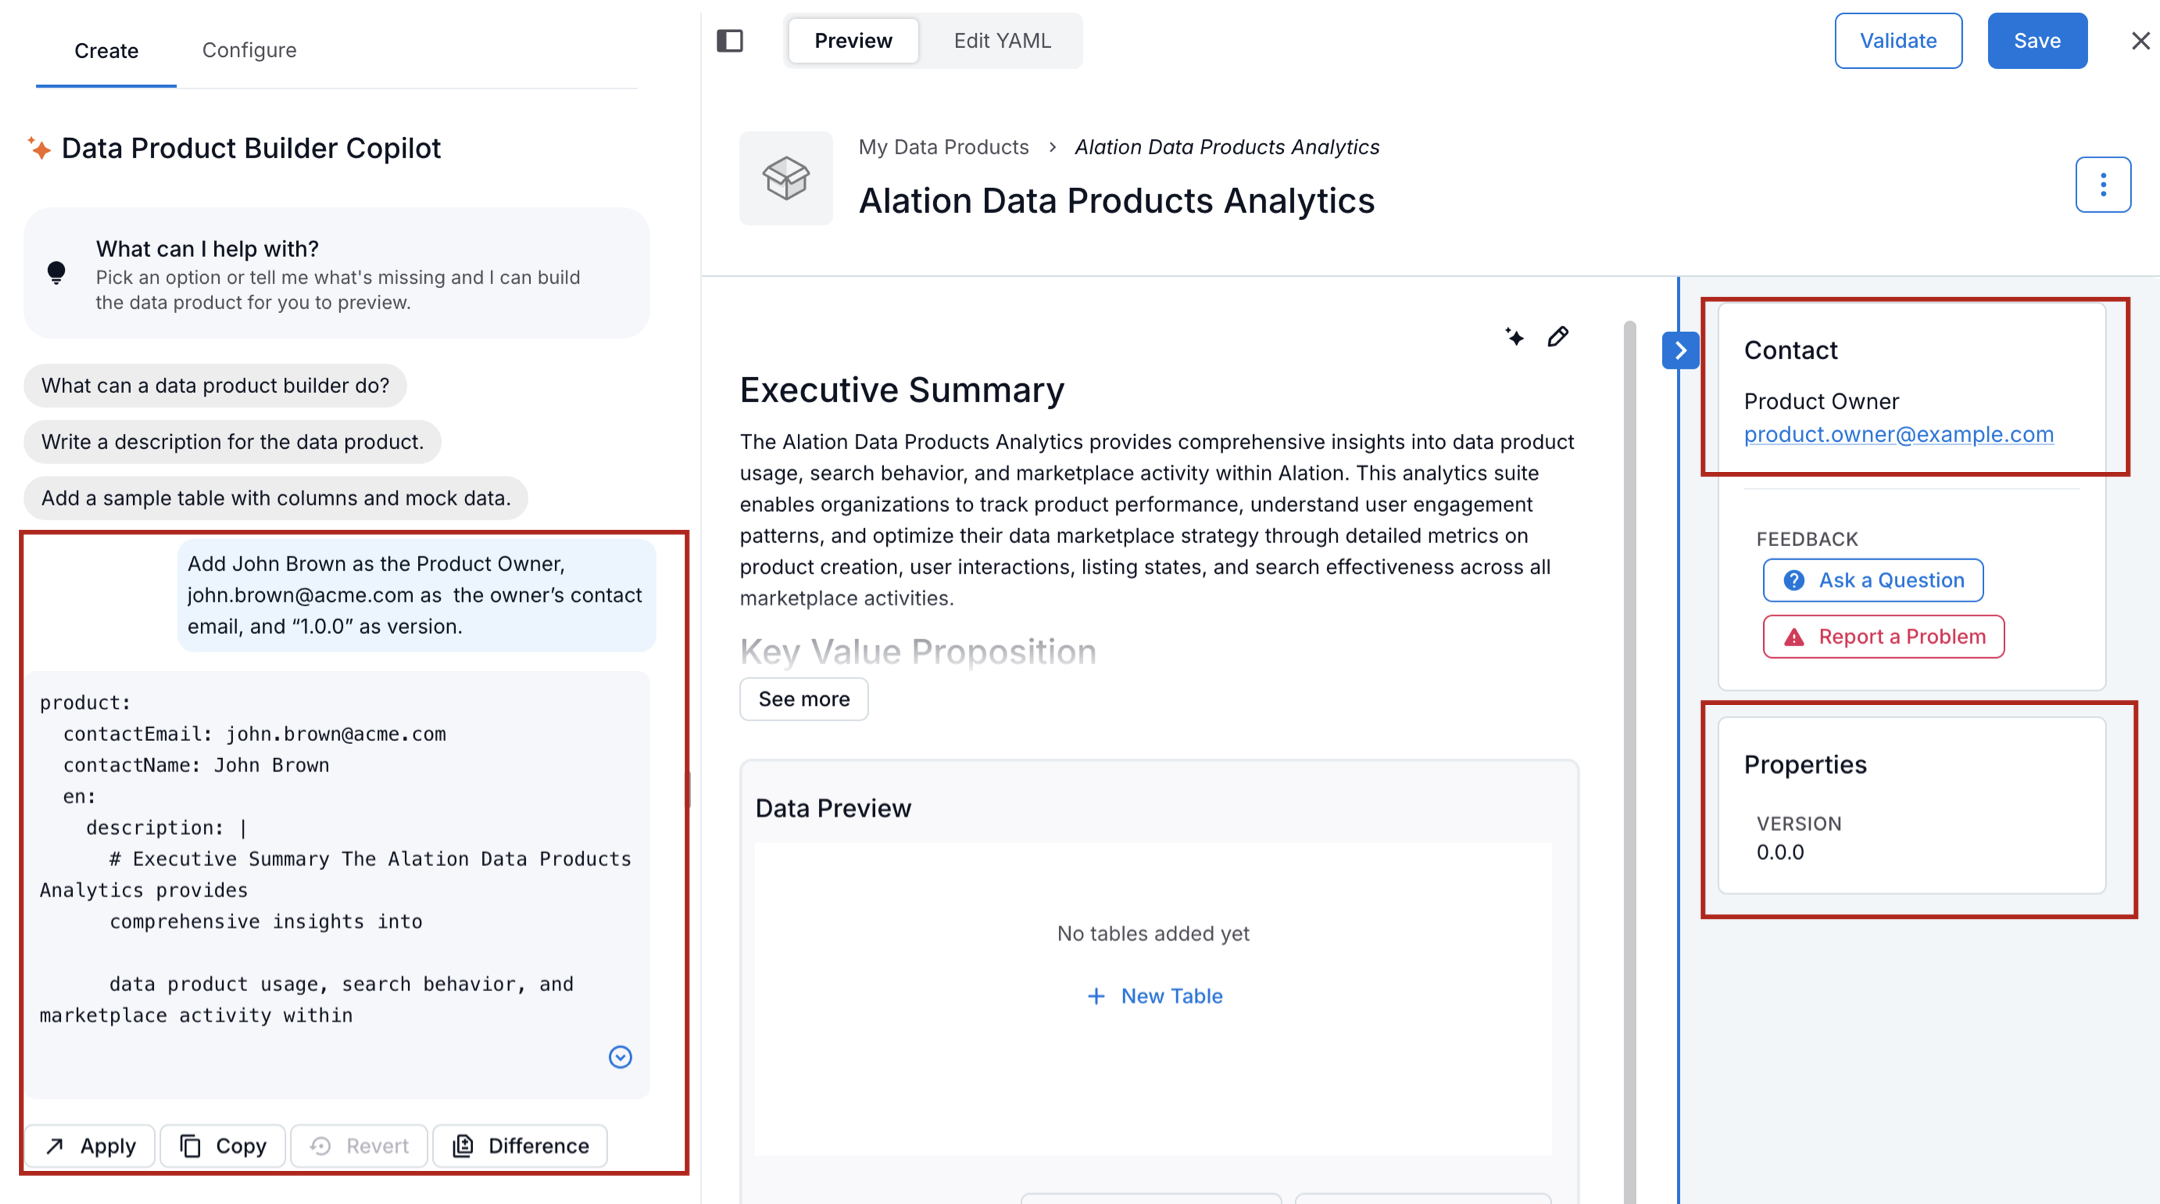
We’ll use the Data Products Builder Copilot to populate the owner-related fields.
Before you begin, look at the Properties panel on the right side of the editor. It includes Contact and Properties sections, which currently contain placeholder values. You’ll replace these with real information.
To update owner information with Copilot:
In the Builder Copilot panel on the left, enter a prompt that tells Copilot to update the owner-related fields. For example:
Add John Brown as the product owner, john.brown@acme.com as the owner’s contact email, and 1.0.0 as the version
Send the prompt to Copilot. Copilot processes the request and returns a YAML snippet that includes the updated values.
Review the generated YAML.
Click Apply to apply the changes. The updated values appear in the Contact and Properties sections of the Properties panel on the right.
Step 3: Add a Dataset
The core of a data product is the dataset that the data product consumers use to explore and analyze their area of interest. When you create data products in Alation, you add data assets directly from the catalog. This means the data product automatically inherits existing metadata, such as table and column descriptions, from the catalog.
To add tables and columns:
In the data product editor, locate the Data Preview section.
Click + New Table.
In the Quick Search dialog, search for and select a table.
The Select Columns dialog opens. Choose all columns or only the specific columns you want to include.
You can sort columns by Popularity to help with selection.
Select Generate descriptions when missing to use AI to generate descriptions for columns that don’t already have them. These descriptions are visible to data product consumers.
Click Add table and columns. Alation adds the selected tables and columns to the data product and generates descriptions where requested.
To add more tables, click + New Table again and repeat the steps.
Step 4: Add Metrics Metadata
You can enrich the context of a data product by adding metric metadata. Metrics help define how values are calculated on the data product’s dataset and provide additional context that improves the quality and accuracy of Chat responses.
Metric metadata consists of SQL expressions that define how specific values are calculated. For example, if your data product is used to calculate key business metrics, you can add the corresponding SQL expressions as metric metadata so Chat can interpret and respond to questions more accurately.
Important
You can add metric metadata only after you’ve added datasets (tables and columns) to the data product. Adding datasets is a prerequisite for defining metrics.
To add metrics metadata to a data product:
In the data product editor, locate the Metrics section.
Add metrics in one of two ways:
After adding or updating metrics, click Save in the top-right corner of the data product page to save your changes.
Add Metrics Manually
To add metrics manually, you must have a SQL query or a valid SQL expression that defines the calculation.
In the Metrics section of the data product editor, click Add New Metrics and select Extract from SQL. The New Metrics dialog opens.
Paste the SQL query or enter the SQL expression in the SQL text area.
Click Validate SQL.
Alation parses the SQL and checks whether it’s valid:
If the SQL is invalid, validation fails, and you can’t proceed. The New Metrics dialog displays error messages and line numbers to help you correct the issue.
Fix any errors and click Validate SQL again.
When the SQL is valid, click Extract Metrics. The extracted metric is added to the Metrics table in the data product.
Generate Metrics Using AI
To generate metrics automatically using AI:
In the Metrics section of the data product editor, click Generate Metrics.
Alation analyzes the catalog context for the data product, including published queries for the included tables, and generates a suggested set of metric expressions. Once the generation process completes, the list of metrics is displayed in the Review dialog.
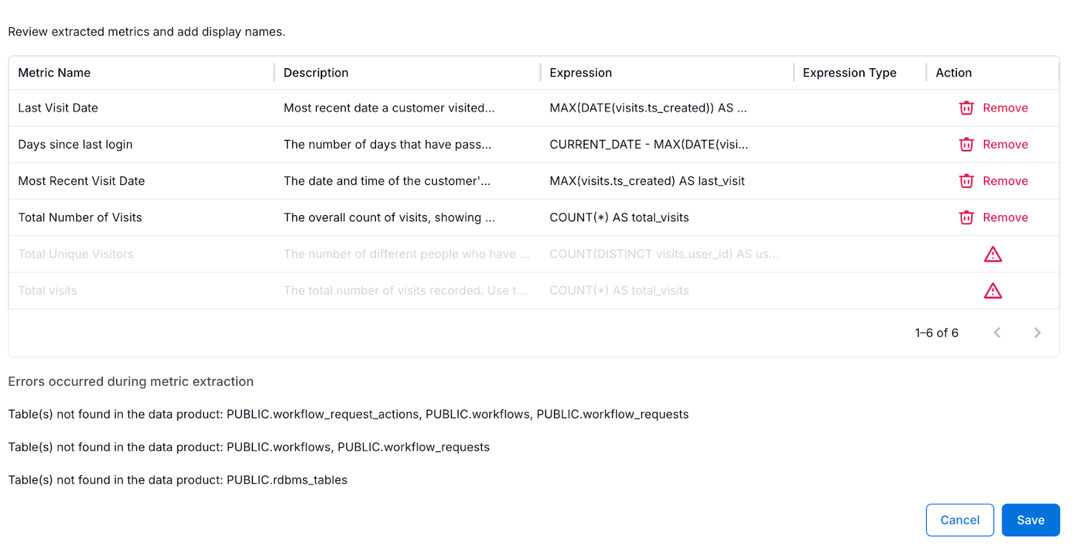
Review the generated metrics, errors, and warnings carefully. Remove any metrics that are irrelevant or incorrect.
Click Save in the dialog to add the selected metrics to the Metrics table.
Click Save in the top-right corner of the data product page to save your changes.
Step 5: Configure Advanced Properties
Add Mock Data
You can optionally add mock data to the tables in a data product. Mock data isn’t real data, but it conforms to the table schema and represents what the actual data might look like. It helps data product consumers understand the structure of the data and what query results may look like.
You can add mock data in two ways:
Add Mock Data Using Copilot
In the Builder Copilot panel on the left, enter a prompt that instructs Copilot to add mock data for one or more tables. You can specify how much mock data to generate. For example,
Add 5 rows of mock data for the Visits table.
Send the prompt to Copilot. Copilot processes the request and returns a YAML snippet that includes the generated mock data.
Review the generated YAML.
Click Difference to see where the new lines were added.
Click Apply to apply the changes if you’re satisfied with the result.
In the Data Preview area, open the Mock Data tab for the table and confirm that the mock data appears as expected.
Note
If you need to make corrections, you can edit the mock data directly in the YAML editor. See the section below for details.
Add Mock Data Directly in the YAML Editor
You can add mock data directly in the YAML specification for a data product.
In the YAML, dataset information is defined under the recordSets property. Each record set represents a tabular dataset and includes metadata, schema information, and sample data.
Mock data is added to the sample property in CSV format.
Example YAML structure for recordSets:
recordSets:
    account_details_main:
      name: ACCT_DETAILS_MN
      displayName: Account Details Main
      description: |
          Contains detailed information about customer accounts,
          including balances and account identifiers.
      sample:
          type: mock
          data:
            ACCOUNT_NUMBER,CITY,ACCOUNT_BALANCE,FIRSTNAME,LASTNAME
            1234567890,New York,5000.50,John,Doe
            2345678901,Los Angeles,7500.75,Alice,Johnson
      schema:
        - name: ACCOUNT_NUMBER
          displayName: Account Number
          description: Account number.
          type: NUMBER(38,0)
        - name: CITY
          displayName: City
          description: City where the account is held.
          type: VARCHAR(31)
        - name: ACCOUNT_BALANCE
          displayName: Account Balance
          description: Current balance of the account.
          type: FLOAT
        - name: FIRSTNAME
          displayName: First Name
          description: First name of the account holder in the "acct_details_mn" table.
          type: VARCHAR(10)
        - name: LASTNAME
          displayName: Last Name
          description: Last name of the account holder in the "acct_details_mn" table.
          type: VARCHAR(12)
To insert mock data:
In the data product editor, turn on Edit YAML to open the YAML editor.
Locate the table you want to add mock data to under the recordSets property.
Add a sample property using the structure below. Make sure the mock data matches the table schema and is formatted as valid CSV.
sample:
  type: mock
  data: (your mock data in CSV)
Example:
sample:
  type: mock
  data:
    ACCOUNT_NUMBER,CITY,ACCOUNT_BALANCE,FIRSTNAME,LASTNAME
    1234567890,New York,5000.50,John,Doe
    2345678901,Los Angeles,7500.75,Alice,Johnson
Toggle Preview to view how the mock data appears on the data product page. The mock data is displayed under the Mock Data tab in the Data Preview section. The following screenshot shows the Mock Data section.

Click Save on the top right of the data products editor to save your changes.
Add a Data Product Logo and a Short Description for the Marketplace
You can add a logo and a short description to improve how your data product appears in the Marketplace.
The logo visually distinguishes your data product and appears next to its name.
The short description appears on the data product tile in the Marketplace.
The logo image must be accessible from within your network.
You can add both the logo and the short description either by using Data Products Builder Copilot or by editing the YAML directly.
Add a Logo and Short Description Using Copilot
In the Builder Copilot panel, enter a prompt that instructs Copilot to add the
logoUrlandshortDescriptionproperties, and include the values you want to use. For example,Add a data product logo using this URL: “https://staticresources.com/logos/mylogo.svg”. Add a short description with the following text: “This data product captures Alation catalog usage by users.”
Send the prompt to Copilot. Copilot generates a YAML snippet with the requested changes.
Review the output carefully.
Click Difference to compare the changes with the previous version of the YAML.
Click Apply if you’re satisfied with the result.
Click Save to save your changes.
Add a Logo and Short Description by Editing YAML
In the data product editor, turn on Edit YAML to open the YAML editor.
Locate the en property under the product section.
Add the following properties:
logoUrl: The URL of the logo imageshortDescription: A brief summary of the data product (maximum160characters)
Example YAML:
product:
  contactEmail: john.morris@alationmail.com
  contactName: John Morris
  productId: product_1
  version: 1.0.0
  en:
    name: Alation Data Products Specification
    description: |
        # Product Description In Markdown
        This is a description of the product.
    logoUrl: https://www.example.com/logo.png
    shortDescription: Short description of the product.
Toggle Preview to view the logo and short description. (You may need to refresh the browser page to see the updated logo.)
Click Save in the top-right corner of the editor to save your changes.
Configure Access Request Instructions
You can specify instructions that explain how data consumers can access the data in your data product. These instructions appear on the data product’s catalog page and guide users through requesting or obtaining access.
Access instructions are configured through the deliverySystems property in the YAML specification. Each delivery system represents a supported way for consumers to access the data and helps make the data product more discoverable and usable in the catalog.
You can configure delivery systems either by:
Using the Data Products Builder Copilot, or
Editing the YAML directly
Each delivery system:
Defines a specific access path (for example, direct database access or APIs)
Enables access-related actions on the data product’s catalog page
When delivery systems are configured, the following buttons appear on the catalog page:
Request Access: Opens instructions for requesting access, based on your configuration
Get Data: Provides the data endpoint (such as a SQL connection URI, BI dashboard, or API URL)
Delivery systems are automatically added when you add at least one table to your data product. When this happens, two delivery system entries are created in the YAML specification:
chat_with_<database>: Used to enable AI chat for the data product
<database>: Used for direct data access (for example, via Compose or a database connection)
The <database> name reflects the underlying database type. For example, if the data source is PostgreSQL, you’ll see delivery systems named chat_with_postgresql and postgresql.
Example: deliverySystems structure in YAML
deliverySystems:
  chat_with_postgresql:
    type: sql
    uri: postgresql://<...>.us-east-1.rds.amazonaws.com:5432/t_<...>_alation_analytics_v2
    accessRequestInstruction:
      type: text
      instruction: |
        Connect directly to the PostgreSQL database using the provided connection URI.
        Contact your administrator for database credentials and connection details.
  postgresql:
    type: sql
    uri: postgresql://<...>.us-east-1.rds.amazonaws.com:5432/t_<...>_alation_analytics_v2
  recordSets: <...>
Delivery System Properties
For each delivery system, you can configure the following properties:
type(required): One ofsql,sqlgui,api,bi,spreadsheet,app, orother
uri(required): A link or endpoint that users use to access the data
accessRequestInstruction(optional): Instructions shown in the UI to guide users on how to request access. Supports Markdown and includes:
type: Currently, only text is supported
instruction: Required, step-by-step instructions
request: Optional, a templated message users can copy when requesting access
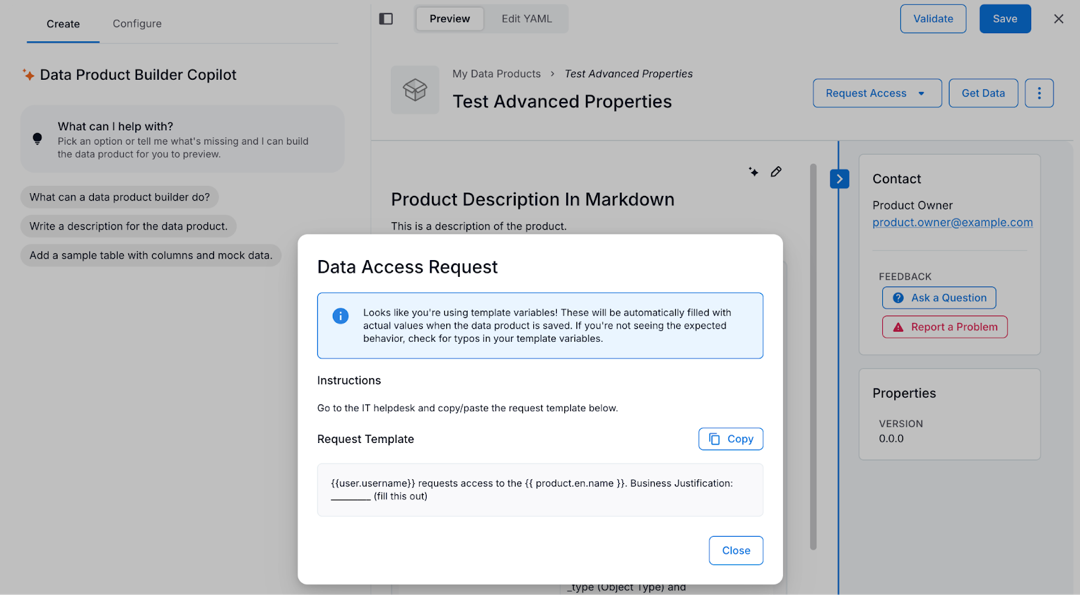
Add Request Access Instructions
You can configure access request instructions either by using Data Products Builder Copilot or by editing the YAML directly.
Determine the access process you want to support, such as:
Contacting a data owner directly
Submitting a request through an internal ticketing or approval system
This decision informs what instructions you add to the data product.
In the data product editor, turn on Edit YAML.
Locate the appropriate delivery system under the
deliverySystemsproperty.Add the
accessRequestInstructionproperty.Set
typetotext(the only supported value).Provide clear instructions and, optionally, a request template.
Example YAML:
postgresql:
  type: sql
  uri: postgresql://<...>.amazonaws.com:5432/t_<...>_alation_analytics_v2
  accessRequestInstruction:
    type: text
    instruction: |
        Go to the IT helpdesk and copy and paste the request template below.
    request: |
        {{user.username}} is requesting access to the {{product.en.name}}.
        Business justification: ____________________
Toggle Preview in the editor.
On the data product catalog page, click Request Access.
Select a delivery system from the list. The access request instructions you configured appear for the selected delivery system.
Click Save in the top-right corner of the editor to save your updates to the YAML specification.
Step 6: Validate Against Marketplace Standards
After you’ve finished configuring your data product, validate it against the Marketplace standards. These standards define the requirements a data product must meet to be listed in the Marketplace.
Marketplace standards are a set of rules that apply to specific aspects of a data product. For example, the Marketplace may require:
A detailed description
Mock data
Other mandatory components defined by the Marketplace configuration
If a data product doesn’t meet these requirements, it can’t be listed in the Marketplace.
Validating your data product at this stage allows you to identify and fix any issues early, so your data product is ready to be published when needed.
For instructions on how to validate a data product, see Validate the Data Product.
Step 7: Save Your Data Product Definition
Once you’ve finalized your data product specification, click Save.
Next, you can work to configure the AI Chat for your data product:
Once your data product is ready for data consumers, you can List it On The Marketplace.